Tuesday, April 14, 2020

Som Tum Thai: Green Papaya Salad | 泰式青木瓜沙律

附中文食譜

Thai food lovers will most certainly be no stranger to som tum (ส้มตำ) - or green papaya salad - the salad that is at once impossibly fiery and refreshingly crunchy; intensely savory and insanely tangy - in short, it is a kaleidoscope of explosive sensation on a plate.  

Som tum originates in Isaan, the northeastern region of Thailand bordering Laos (some may argue that the dish originally came from Laos), though it is now widely consumed across the country with a multitude of variations which may include salted crab, fermented fish paste, or green mango in place of papaya. What most of us come to recognize as the typical som tum is actually called "som tum thai" (ส้มตำไทย) - a classic version that is perhaps most palatable internationally as it does not contain any of the more pungent ingredients.

The core ingredients of a som tum are shredded green papaya, tomatoes, green long beans, dried shrimp, and peanuts, pounded together with chilies, fresh garlic, palm sugar, fish sauce, and juicy limes, all of which combine to create a perfect balance of salty, sweet, spicy, and sour. Som tum is almost always prepared with a large clay or wooden mortar and pestle - a must have in any Thai kitchen really - which allows for easy pounding, crushing, and melding of ingredients and flavors. After all, the word tum in som tum is derived from the verb "to pound" (and "sour" for "som"). I have attempted making som tum before by simply tossing the ingredients without a mortar and pestle and, trust me, the salad was just that - a bland, soul-less, "deconstructed" salad. 

Now, what if you haven't got space for an unwieldy mortar and pestle at home? Well, join the club. I may not have one, but instead make use of the resources at home and retrieved a large glass mixing bowl, paired it with my wooden cocktail muddler bought from the Japanese dollar store, and together they just worked wonders.

When it comes to prepping the green papaya, I have at one point or another observed chefs and street cart vendors in Bangkok shredding the green papayas by vigorously slashing and paring away the surface of the fruit, a traditional method that yields an intentionally coarse and uneven shred for extra crunch. My knife skills may be questionable, and I am in no hurry of slashing a finger or two, so I resort to my trustee grater and alternate between the medium and large-sized holes for that effortlessly rustic, crunchy result. 

For the most authentic result, it is ideal to sweeten the dish with Thai palm sugar, available at most southeast Asian grocery shops; if unavailable, substitute with soft light brown sugar for a "same same but different" caramelized taste. With sourness being a dominant flavor in som tum - as the name suggests - the use of fresh lime is essential for a citrusy tang to balance off the sweetness of palm sugar and saltiness of fish sauce and dried shrimp. It is also not uncommon to use a bit of tamarind water in addition to lime juice for a more complex note of sweetness and tartness, so give that a try!
 

On a different note, around this time of year, people all across Thailand would normally be gearing up for the Thai New Year celebrations. Under the ongoing Covid-19 pandemic, however, numerous Songkran events are cancelled, families are urged to stay in, the young are asked to avoid visiting their elderly family members in order to protect the most vulnerable, and international travel continues to be severely restricted. What is usually the most festive national holiday, doused with globally renowned ritual water splashing that draws tens of thousands of visitors each year, may present an oddly quiet scene this year. As with the rest of the planet, I hope that this global crisis will soon come to an end, and that life can resume its track as soon as possible for all.

With that said, sawadee pee mai krub!

Ingredients
Half a green papaya (about 2-3 cups shredded)
Half a small carrot
6 string beans or 2 long beans
1-2 small tomatoes or 6 cherry tomatoes
1-3 red bird’s eye chilies 
2 garlic cloves
1 1/2 tablespoons Thai palm sugar
1 1/2 tablespoons fish sauce
Juice of 1-2 Thai limes
2 tablespoons peanuts
1 tablespoon dried shrimp (optional)
 
Directions
1. In a small, dry frying pan, toast the peanuts over medium heat until fragrant and golden brown. Remove and set aside.
2. Peel and shred green papaya and carrot with a julienne peeler or a regular cheese grater with medium to large sized holes. Trim ends and cut long beans into 2-inch segments. Slice tomatoes into wedges, or halve the cherry tomatoes if using.

3. Cut each garlic clove into three pieces. Coarsely smash garlic and whole chilies in a mortar and pestle. Add the palm sugar, beans and tomatoes. Lightly pound to bruise the beans and break up the tomatoes, and ensure that the palm sugar is fully dissolved. Squeeze in the lime juice and fish sauce and pound to combine.
4. Add the green papaya, carrot, dried shrimp (if using), and toasted peanuts. Lightly pound and toss to combine. Check seasoning. The taste should be sweet and salty in perfect balance, with a sharp, sour and spicy tang. Plate up and enjoy fresh!

Tried this recipe?
Share with me or leave a comment below! Tag #alvinspenthousekitchen.
Find me on Instagram @alvinckl and @alvin.penthousekitchen and follow my Facebook Fan Page!

【 泰式青木瓜沙律 】

Sawadee Pee Mai Krub!適逢泰國迎接新年,同大家分享地道前菜簡易食譜!青木瓜沙律 (ส้มตำ) 味道酸辣鮮甜又醒胃,往往叫人食得津津有味。就是使用街市常見用來煲湯的那種青木瓜,十元八塊就可以泡製爽脆新鮮的 Som Tum - 在家都能輕易造出正宗泰國風味!

材料:
青木瓜                 半個
甘筍                     半枝
長豆角                 2 條
小蕃茄                 1 個(或車厘茄 6 粒)
指天椒                 1 - 3 隻
蒜頭                     2 瓣
棕櫚糖                 1 1/2 湯匙
魚露                     1 1/2 湯匙
泰國青檸            1 - 2 個
花生                     2 湯匙
蝦米                     隨意
 
1. 花生用乾鍋烘香,備用。
2. 青木瓜和甘筍去皮刨絲,長角豆切段,番茄切件(車厘茄切半)。
3. 把蒜頭和指天椒摏碎。
4. 加長角豆、番茄和棕櫚糖輕輕摏碎至糖完全溶解。
5. 倒入魚露和新鮮青檸汁,拌勻來混合各種材料。
6. 加入青木瓜、甘筍絲、蝦米和花生,一邊繼續輕輕摏碎、一邊拌勻,令各樣材料更為入味。試味並再作適當調味,即成!

Tried this recipe?
Share with me or leave a comment below! Tag #alvinspenthousekitchen.
Find me on Instagram @alvinckl and @alvin.penthousekitchen and follow my Facebook Fan Page!

Thursday, April 2, 2020

Steamed White Sugar Sponge Cake | 傳統白糖糕

附中文食譜
The classic Chinese steamed white sugar sponge cake is a childhood favorite for many, and it is no exception for me growing up in 1990's Hong Kong. The sheer thought of this humble street snack brings back many sweet memories - of my mother always buying me a couple of slices every time she visited the wet market; and me always looking at her with puppy eyes whenever we passed by a shop selling the familiar triangular slices. It is a symbol of joy in its simplest form.

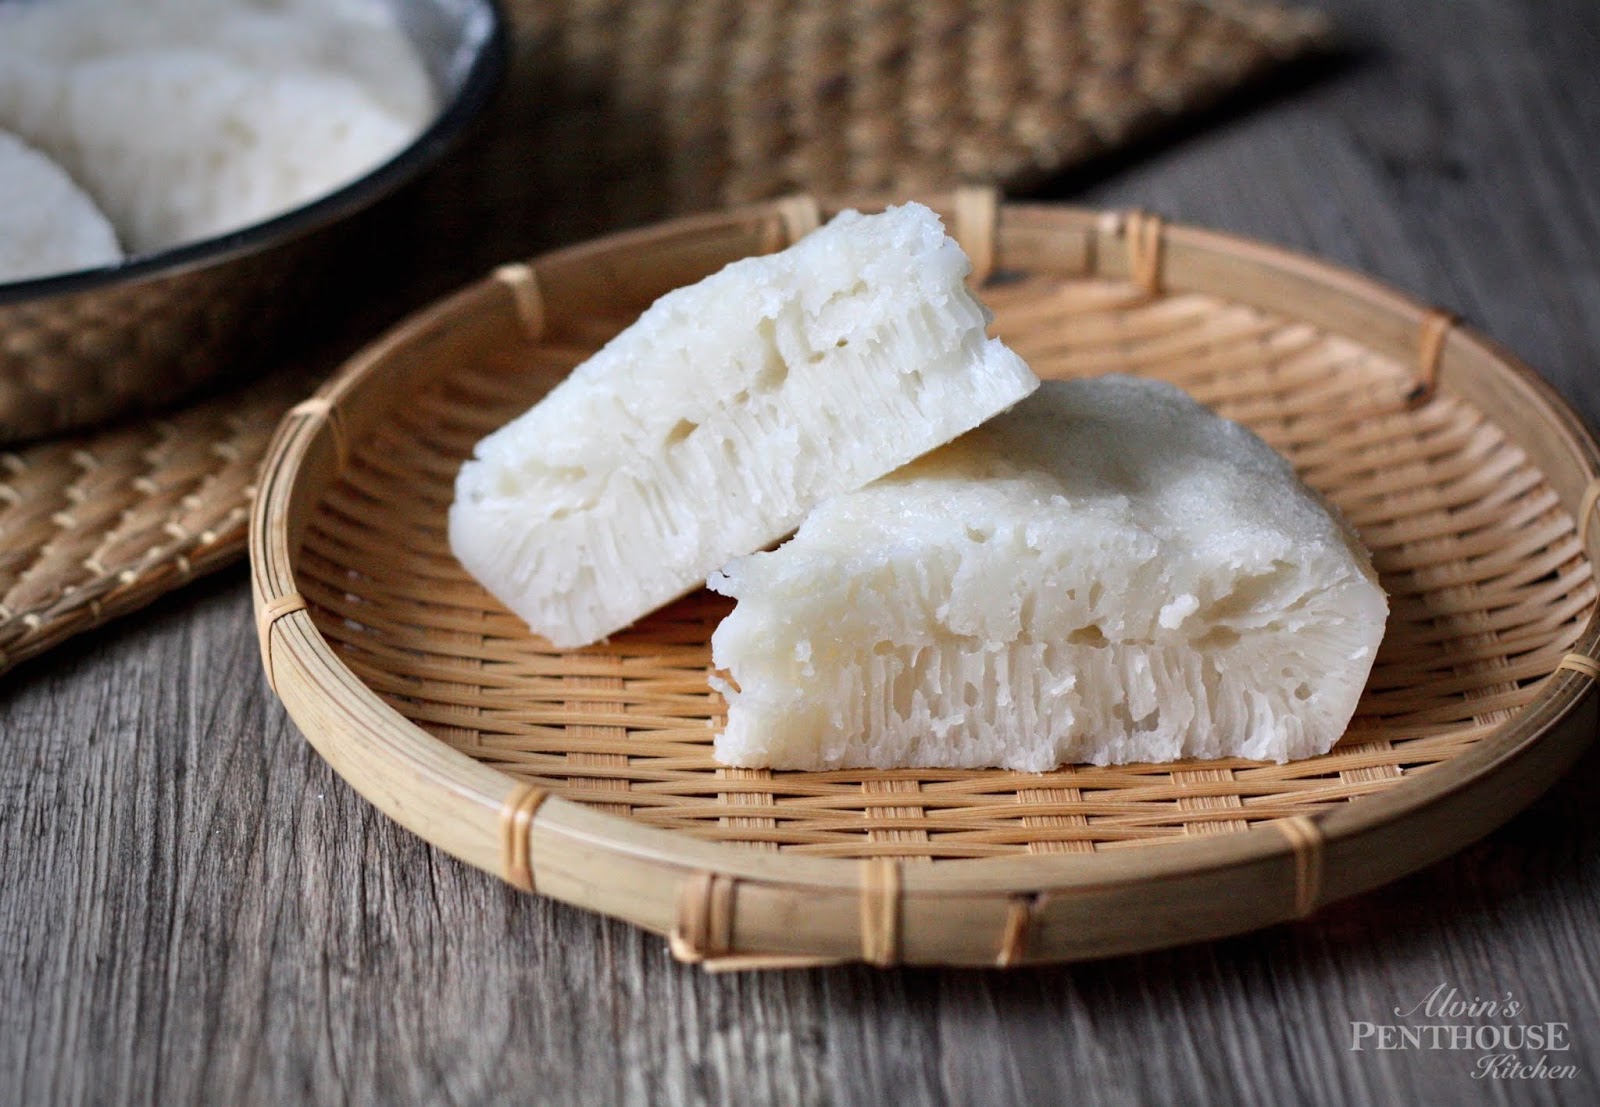
The steamed white sugar sponge cake (白糖糕, bak tong gou) is light and fluffy, glossy and slightly sticky to the touch, and moist and springy on the inside. It is sweet - but not tooth-achingly sweet, with a faint floral aroma that reminds of sweet rice wine and fermented glutinous rice that I adore (even as a child) and later come to recognize as yeast. Tearing into the cake would reveal an intricate honeycomb-like columnar structure that I always, to this day, find absolutely fascinating.

I may have since then left home for the United States for school for a number of years and not had bak tong gou for ages, but my affinity for this childhood favorite never weakened. Even upon my return to Hong Kong, I always made a stop at this old hawker who sold all kinds of traditional homemade confections from a little cart on Wellington Street, Central. This old hawker would have long gone by now. And with this old gentleman being quite possibly the very last hawker vending traditional sweets under the government's non-transferable itinerant hawker license, bak tong gou and the like will now be only found at handfuls of traditional bakeries, congee shops, and occasional dim sum lunches across town. The fond memories that many of us share of this childhood favorite, however, never fades.

Making the steamed white sugar sponge cake at home is really rather simple. With such a simple and inexpensive ingredient list, making this cake yourself and revisiting the memory lane might in fact be easier than finding this cake on the streets these days. As the name suggests, bak tong gou calls for granulated white sugar, giving the cake that pure white appearance that becomes slightly off-white only with the addition of yeast. Using brown sugar would create a sister version of the sponge cake, (黃糖糕) wong tong gou, or as Hong Kongers call it - steamed yellow sugar sponge cake. And like many traditional Chinese cakes, the sponge cake is steamed rather than baked.

The yeast gives the steamed sponge cake a distinct, honeycomb-like columnar texture and appearance
I have tried different methods and measurements for making the bak tong gou, and the one I share here by far trumps all others when it comes to effort and ease. Conventional approach will suggest cooking the rice flour mixture together with the sugar syrup over low heat on the stove top, which would require rigorous stirring and a greater attention span to prevent lumps from forming. I have also tried the double-boiler method which, while providing less direct heat, likewise requires continuous stirring. Instead, to make life and an already easy recipe a whole lot easier (who doesn't like the sound of that?), simply dissolve the sugar and yeast in warm water and add them to the rice flour mixture and give that a good stir, and the mixture is ready to rest.

Bak tong gou should taste sweet but not sour, which is a sign of over fermentation
By doing this, not only will you save loads of time from having to wait impatiently for the mixture to cool down before adding the yeast (lest you kill the yeast), you also spare a whole lot of elbow grease and the risk of ending up with undesirable lumps in the batter. Boom, an easy recipe just made even easier.

After putting together the batter, it is to be simply left covered for hours to allow the yeast to do its thing. The exact amount of time varies with ambient temperature, ranging anywhere from three hours in summer up to seven in colder months. Following the below technique will significantly cut the idle time, regardless the season.

I have long been known to detest precise measurements in the kitchen, relying almost too wholeheartedly on "the senses" and cups and tablespoons and only reluctantly pulling my kitchen scale out when converting recipes into metric units when called for. Most recipes online for the steamed sponge cake come in metric unit. Fortunately, the steamed sponge cake is very forgiving to minor mathematical errors. Out of convenience, here I provide both measurements in cups as well as grams or millimeters. From here on out, with this recipe finally consolidated and added to my collection, I am rejoicing that my kitchen scale can rest in peace inside the cabinet whenever I make bak tong gou. Perhaps I would be making this cake and walking down the memory lane more often from now on!

Ingredients...
1 cup warm water, divided
1 cup water
2 cups (280 g) rice flour
3/4 cup (150 g) white sugar, divided
2 teaspoons active dry yeast
1/4 teaspoon vegetable oil

Proofing the yeast & making the batter
1. Transfer 1/4 cup of the warm water into a cup or bowl. The water should be around or just slightly higher than body temperature (roughly 100°F/38°C) and not hot to the touch. Tip in the active dry yeast along with 1/2 teaspoon of the sugar, stir well and let rest for 10 minutes or until foamy.

2. In a large mixing bowl, combine the rice flour and 1 cup of water (room temperature). Stir until thick and smooth.

3. Add sugar to the remaining 3/4 cup of warm water and mix well until sugar dissolves. Check that the syrup is close to body temperature and not hot to the touch.

4. Add the yeast mixture and syrup to the flour mixture and stir well to combine. Cover with cling wrap and place inside a microwave or oven along with two cups of boiling water to generate heat. Close the door and let the batter rest for 2 hours or until large bubbles form on the surface of the batter. Refresh the boiling water to speed up the process if needed.


Steaming the cake
1. Grease a 9-inch round cake pan generously with oil. Once the batter is ready, remove from the oven, stir well, and transfer batter to a large measuring cup. Add vegetable oil and stir to combine.

2. For a smoother cake surface, pour batter over a strainer into the cake pan and discard the foam. Steam over high heat, covered with the lid wrapped with a tea towel, for 25 minutes.

3. Turn the heat off and allow the cake to rest in the steamer for 10 minutes with the lid off. Remove cake from the steamer and let cool for another 10 minutes on the counter. Slice and enjoy fresh at its best!

Note: Cover and store at room temperature for up to 24 hours. After that, refrigerate for up to 4 days. To reheat, steam gently.

Is Bak Tong Gou also your childhood favorite?
Share with me or leave a comment below! Tag #alvinspenthousekitchen.
Find me on Instagram @alvinckl and @alvin.penthousekitchen and follow my Facebook Fan Page!

【 傳統白糖糕 】

細對白糖糕就有著一種情意結。想當年媽媽知道我最愛白糖糕,每次落街市都會買來給我吃;人大了,白糖糕依然充滿著童年回憶。別看白糖糕外表平凡,一件好的白糖糕雪白晶瑩、味道清甜芳香而不酸、入口爽滑而稍韌,難怪令人難以抗拒。自家製白糖糕十分簡單,經過屢次改良,終於研製出以下最簡易、最省時、零失敗的食譜跟大家分享、一起懷緬童年!

材料:
溫水*                      240 毫升
清水                        240 毫升
粘米粉                    280 克
砂糖                        150 克
即溶酵母                2 茶匙
菜油                        1/4 茶匙

做法:
1. 先用 60 毫升溫水來開即溶酵母,加入半茶匙砂糖,拌勻備用約 10 分鐘。
2. 粘米粉及清水拌勻至輕微黏稠狀,備用。
3. 剩餘砂糖與溫水攪勻至完全溶解。
4. 將發好起泡的酵母和糖水加入粘米粉漿內拌勻。
5. 蓋上保鮮紙,連同 2 杯滾水放置在微波爐或焗爐裡面發酵 2 小時,直至粉漿出現大氣泡。滾水會製造蒸氣熱力,有助粉漿在受控的環境下迅速發酵。
6. 發酵好的粉漿加入菜油拌勻,隔篩(隔除過量氣泡,白糖糕表面會更加光滑)倒入已掃油的圓形不鏽鋼碟內,用大火蒸約25分鐘。
7.  熄火開蓋,待涼約 10 分鐘後把白糖糕取出再晾涼約 10 分鐘後切件即成!

備註:
1. *注意暖水溫度應接近或輕微高於體溫,不應燙手,不然會「殺死」酵母。
2. 家中如有蒸籠,可以用蒸籠去蒸,不然可以用毛巾包著煲蓋隔水蒸,有助防止倒汗水滴在糕面,影響製成品。
3. 正宗白糖糕其實不該帶有酸味,而酸味可能來自發酵過度。

Is Bak Tong Gou also your childhood favorite?
Share with me or leave a comment below! Tag #alvinspenthousekitchen.
Find me on Instagram @alvinckl and @alvin.penthousekitchen and follow my Facebook Fan Page!

Wednesday, March 25, 2020

Bircher Muesli: Overnight Oats | 什錦果麥早餐

附中文食譜
The first time I've ever tried Bircher muesli was actually on an inflight breakfast tray - the bowl of oats was creamy, delicious, and feels healthy - and after a second helping it also kept my belly happily and reasonably full. Bircher muesli took on the name of a Swiss physician named Maximilian Bircher-Benner, who in around 1900 encouraged his patients to have a diet rich with raw fruit and vegetables to cure their ailments, and developed a breakfast that is till today popular throughout Switzerland and Germany.

In a hurry in the morning? Pack the muesli in a container the night before and take it to go in the AM!
Unlike oatmeal porridge cooked on stove top (a common breakfast even in Hong Kong), Bircher muesli requires no cooking but rather soaking raw oats overnight, allowing the grains to absorb the liquid and soften enough to eat uncooked, hence the name overnight oats. The virtue of overnight oats is really in its ease of preparation - all it takes is just minutes to stir everything together the night before and there you have a nutritious breakfast always on standby for the rest of the week. It is perfect for early mornings or for breakfast on the go. And though Bircher muesli is called overnight oats, all you really need is several hours to let the oats soften sufficiently.

All it takes is just minutes to stir everything together the night before- brekkie is ready in the morning.

Packed with slow-release energy, protein, fruit and seeds, this easy overnight oats recipe is a complete breakfast to get your day started and keep you going until lunchtime. The recipe provides the base for countless variations - customize your Bircher muesli with any seeds and nuts, seasonal fruits, and choice of dairy or plant-based milk. The addition of chia seeds not only gives a major protein boost, it also gives the muesli a rich creaminess. Experiment with mixing in yoghurt, applesauce, or even nut butter. As far as toppings go, you can use just about anything your heart desires for fruit and nuts.

Bircher muesli is typically enjoyed chilled, making it perfect for warmer months
Ingredients
1 cup (100 g) whole rolled oats
1 1/2 tablespoon chia seeds
1 tablespoon pumpkin seeds
Small handful of dried cranberries, raisins, or goji berries
1 apple
1 1/2 cup milk of choice
A dash of pure vanilla extract, optional
A drizzle of maple syrup, optional

Directions
Peel and coarsely grate half the apple, reserving the other half for the morning. Combine all ingredients in a bowl and mix thoroughly. Cover and place in the fridge overnight or at least for 1 hour. When ready to serve, stir through the muesli and top up with a splash of milk if desired. Top with freshly grated apple, berries, nuts and seeds, granola or any toppings as desired or enjoy as it is!

Tried this recipe?
Share with me or leave a comment! #alvinspenthousekitchen 
Find me on Instagram @alvinckl and @alvin.penthousekitchen and follow my Facebook Fan Page!

【 什錦果麥早餐 】  


材料:
燕麥片               100 克
奇亞籽               1 1/2 湯匙
南瓜籽               1 湯匙
各式乾果           適量(蔓越莓、提子乾、杞子)
蘋果                    1 個
牛奶或植物奶  350 毫升
純雲呢拿香精  數滴(可免)
純楓糖漿           隨喜好(可免)

做法:
將半個蘋果去皮,刨成絲,另一半留起備用。把所有材料放入碗內,拌勻。蓋好後放入雪櫃存放一整夜或最少一小時。可存放三天。翌日享用時,拌勻並隨喜好加上新鮮蘋果、香蕉、各式鮮莓和堅果。


Tried this recipe?
Share with me or leave a comment! #alvinspenthousekitchen 
Find me on Instagram @alvinckl and @alvin.penthousekitchen and follow my Facebook Fan Page!