Showing posts with label Breakfast and brunch. Show all posts

Wednesday, July 22, 2020

Banana Bread French Toast, Candied Walnuts and Banana Brûlée | 法式香蕉蛋糕西多士

附中文食譜
Overripe bananas? Make banana bread. Bored of plain banana bread? Make banana bread French toast! For the longest time, banana bread is the obvious solution to an over-abundance of bananas that may have past their retail prime, but now, there is a very real reason to make a loaf with all intents and purposes.

The first time I've had banana bread French toast was at a little cafe in the suburbs of Brisbane, Australia. The thick, golden, battered slice came topped with a generous scoop of house-made ice-cream and a crunchy nut streusel then drizzled with local honey. One bite and the rest was history. I swore this would go on the menu were I to open up a cafe one day. Even if that does not happen eventually, the fantasy lives on.

As banana bread is already naturally sweet, no additional sugar is necessary in the milk and egg batter
Brunch just got sexier: treat yourself to a heavenly brunch with this French toast with a scrumptious twist!
Switching up regular toast with banana bread adds a scrumptious twist to this weekend brunch classic. The tender, moist cake makes a wonderful canvas that soaks up the milk and egg batter, seamlessly marrying the aroma of sweet banana with the warmth of cinnamon and vanilla. It is simply heavenly pan-fried in a generous dose of butter. Now, one could opt to stop right there with just French toast with perhaps a drizzle of maple syrup, a light dusting of confectioners sugar, or a side of fresh berries. But as they say, go big or go home - why not take this up another notch?

As banana bread has a relative high moisture content, you may find that it never quite crisps up as much as stale bread when making French toast. It gives us all the more reason to pair banana bread French toast with additional toppings that bestows just that extra va-va-voom it needs.

Think sticky candied walnuts that adds an irresistible crunch and toasty flavor; and torched banana that brings a delicate smokiness to the palate.

Banana bread French toast just went from sexy to sensational. And if that still doesn't suffice? Make it a-la-mode: top it all with a generous scoop of vanilla ice-cream. And if that still doesn't do the trick? Give it a drizzle of dark rum. That, I believe, should hit it out the ball park.

Torching not only takes away the raw edge in the banana, but also adds a tantalizing smokiness to the ensemble

Now, this may not be your typical low-calorie brunch. But let's face it - no one's exactly thinking of going on a diet when making French toast. Rather, I say, why not make each French toast count?

To make this banana bread French toast, you will need to first make banana bread. Get the recipe here (day-old banana bread is even better!):
Classic Banana Bread

Ingredients: Servings for 2
Banana Bread French Toast
4 slices banana bread, sliced 1-inch thick
1 egg
1/4 cup whole milk
Drizzle of vanilla extract
1/4 teaspoon ground cinnamon
1 tablespoon butter

Quick Candied Walnuts
A palmful of walnuts (approx. 25g)
Drizzle of vegetable oil
1 teaspoon brown sugar
1 teaspoon honey

Banana Brûlée
1 ripe but firm banana
Brown sugar

Directions
Banana Bread French Toast
Whisk the egg, milk, cinnamon and vanilla extract in a shallow dish. Dip the banana bread slices into the egg mixture, coating both sides and let soak for 1 minute on each side. Heat butter in a large skillet over medium heat. Add the banana bread slices to the skillet and cook until golden, about 2 to 3 minutes per side. Repeat with remaining slices.


Quick Candied Walnuts
Preheat oven to 220°C/425°F. Coat walnuts with oil, brown sugar, and honey. Transfer nuts to a parchment-lined baking sheet and roast for 7-8 minutes until golden and bubbling. Keep an eye on them once you smell the fragrance of roasted nuts as they burn quickly. Remove from oven and let cool to form the crunchy glaze.


Banana Brûlée
Choose firm, just-ripe bananas so they don't fall apart. Slice bananas into half-inch coins. Arrange on a heat-proof dish and sprinkle brown sugar liberally over the surfaces. Use butane torch to brûlée, moving the flame evenly back and forth over the sugar coating until caramelized.


Stack banana bread French toast and scatter candied nuts and torched banana over the top. Finish with a drizzle of honey or maple syrup and some fresh berries on the side. For an extra decadent treat, add a generous scoop of vanilla ice-cream. Bon appétit!

What's your favorite topping on a French toast?
Share with me or leave a comment below! Tag #alvinspenthousekitchen.
Find me on Instagram @alvinckl and @alvin.penthousekitchen and follow my Facebook Fan Page!

【 法式香蕉蛋糕西多士 】


材料:
香蕉蛋糕西多士
香蕉蛋糕                     4 件,各 1 寸厚(食譜按此
雞蛋                             1 隻
鮮奶                             60 毫升
雲尼拿香油                少量
肉桂粉                        1/4 茶匙
牛油                            15 克

糖衣烤核桃
核桃                              25 克
菜油                              少量
黃糖                              1 茶匙
蜂蜜                              1 茶匙             

焦糖火炙香蕉
香蕉                              1 隻
黃糖                              少量

做法:
香蕉蛋糕西多士 
1. 雞蛋、鮮奶、肉桂粉和雲尼拿香油加入打勻,放入淺碟中。
2. 香蕉蛋糕浸入蛋液中,每面浸約一分鐘,直至徹底吸滿蛋液。
3. 牛油放入平底鑊中煮溶,放入蛋液香蕉蛋糕,以中火半煎炸至兩面金黃,盛起

糖衣烤核桃
1. 預熱焗爐至 220°C / 425°F。核桃跟油、黃糖和蜂蜜拌勻。
2. 轉放在鋪了烘培紙的焗盤上,焗約 7-8 分鐘。烘好取出晾凉。

焦糖火炙香蕉
1. 選用剛熟而不軟身的香蕉,切成半寸厚的圓片,鋪在耐熱的器皿上。
2. 撒上黃糖,以火槍燒至糖分融化。

在香蕉蛋糕西多士上撒上糖衣烤核桃和焦糖火炙香蕉,再隨喜好淋上蜂蜜或楓糖漿。如欲增加邪惡感,可再添加一球雲尼拿雪糕!

What's your favorite topping on a French toast?
Share with me or leave a comment below! Tag #alvinspenthousekitchen.
Find me on Instagram @alvinckl and @alvin.penthousekitchen and follow my Facebook Fan Page!

Thursday, May 21, 2020

Classic Banana Bread | 香蕉蛋糕

The first thing I ever baked was a banana bread. That goes to show that making banana bread is about as easy as baking can get - so long as you have bananas that are so ripe and freckled they would have otherwise ended up in the reject pile at the supermarket.
While some people make banana bread only as a way to use up forgotten bananas, others like me routinely stake out at the quick sale corner hunting precisely for these often orphaned, blemished, and (heavily discounted) overripe bananas - for none other than to bake the most impossibly scrumptious and moist homemade banana bread. After all, banana bread is half the reason why bananas exist, right?

Over the years I have carried banana bread to the office at my first desk job; brought a slice or two to my hairdresser and bribed a security guard; shared with my fellow chirpy flight attendants during boot camp training as a new recruit; and on countless occasions served it at housewarmings, game nights, or simply as an afternoon treat. Over time, friends, neighbors, co-workers have fallen in love with this banana bread. Some even declared it a favorite.

Banana bread can be something rather ordinary, a usual suspect at coffee shops everywhere; it is so basic and so ubiquitous yet so universally loved it's almost uncanny. Abundant as they are, however, some banana bread may turn out dry, overly sweet or, worse yet, taste of artificial flavoring. What makes homemade ones extraordinary and sets it apart from commercial ones is its texture, the moist and soft crumb, the incredibly rich color and buttery aroma, and the unmistakable natural sweetness from ripe bananas.

Year after year I swear by this simple recipe, deviating only in experimentation with different combinations of sugars. I tend to gravitate towards using brown or even black sugar to imbue the cake with a rich, caramelly flavor and moisture, but also mixing in white sugar just to provide enough sweetness without overpowering the banana flavor. Using white sugar alone will produce a paler banana bread with a more single-noted flavor. The sugar amount is flexible. Most recipes call for one full cup of sugar, but I find 3/4 cup to be just perfect - or even less if you are using very, very ripe bananas or upping banana count to four.

As far as baking goes, banana bread is by far the most beginner-friendly. It is the simplest and most forgiving, especially for someone like me who detests precise measurements and flinch at the thought of baking an angel food cake. There may be plenty of ways to fancy up a good old banana bread; you can add walnuts, pecans, chocolate chips, dark rum, all of which I've tried - but some of my best bakes are the ones that were kept simple and classic. Sometimes simplicity is best (I am a bit of a purist when it comes to banana bread).

Ordinary as it may be, banana bread is surely well loved by all and oddly so it is also one of my most requested recipes from friends. This is my go-to favorite recipe for banana bread, one that I have written out on a loose piece of junk paper and which I have cherished over the years. Calling this the "best-ever" banana bread may be a bold statement, but I am here to admit it might just be the best banana bread you've ever had. It will surely make you go bananas!


Ingredients
1 1/2 cup (195 g) plain flour
1 teaspoon baking soda
1/2 teaspoon salt
3 large overripe bananas
1/2 cup (115 g) unsalted butter, softened
1/2 cup brown sugar
1/4 cup white sugar
2 eggs
1/2 teaspoon vanilla essence

Directions...


Preheat oven at 350F/180C. Cream together the butter and sugar. Crush bananas with a fork or a masher. Add eggs and vanilla essence and combine well with the butter and sugar mixture.

Sift together flour, baking soda, and salt. Fold into creamed mixture. Pour into greased loaf pan. Bake for 50-60 minutes or until toothpick comes out clean.

Do you like your banana bread plain or with nuts?
Share with me or leave a comment below! Tag #alvinspenthousekitchen.
Find me on Instagram @alvinckl and @alvin.penthousekitchen and follow my Facebook Fan Page!

 【 香蕉蛋糕 】


材料:
中筋麵粉               195 克
蘇打粉                   1 茶匙
幼鹽                        1/2 茶匙
無鹽牛油               115 克
紅糖                        110 克
砂糖                        50 克
熟透香蕉               3 條(大)
雞蛋                        2 隻
雲呢拿香油          1/2 茶匙

做法:
1. 預熱焗爐至 350F/180C。
2. 牛油放於室溫軟化,加入糖用攪拌器攪拌至均勻幼滑。
3. 香蕉放在碗裡用叉子壓成泥狀,可以保留一點顆粒口感。
4. 加入雞蛋和雲尼拿香油拌勻,然後跟牛油和糖拌勻。
5. 加入過篩後的麵粉、鹽和蘇打粉,輕輕攪拌均勻。
6. 把粉漿倒入已掃油的糕盤內,放入焗爐焗約 50-60 分鐘至金黃熟透即可。

Do you like your banana bread plain or with nuts?
Share with me or leave a comment below! Tag #alvinspenthousekitchen.
Find me on Instagram @alvinckl and @alvin.penthousekitchen and follow my Facebook Fan Page!


Wednesday, March 25, 2020

Bircher Muesli: Overnight Oats | 什錦果麥早餐

附中文食譜
The first time I've ever tried Bircher muesli was actually on an inflight breakfast tray - the bowl of oats was creamy, delicious, and feels healthy - and after a second helping it also kept my belly happily and reasonably full. Bircher muesli took on the name of a Swiss physician named Maximilian Bircher-Benner, who in around 1900 encouraged his patients to have a diet rich with raw fruit and vegetables to cure their ailments, and developed a breakfast that is till today popular throughout Switzerland and Germany.

In a hurry in the morning? Pack the muesli in a container the night before and take it to go in the AM!
Unlike oatmeal porridge cooked on stove top (a common breakfast even in Hong Kong), Bircher muesli requires no cooking but rather soaking raw oats overnight, allowing the grains to absorb the liquid and soften enough to eat uncooked, hence the name overnight oats. The virtue of overnight oats is really in its ease of preparation - all it takes is just minutes to stir everything together the night before and there you have a nutritious breakfast always on standby for the rest of the week. It is perfect for early mornings or for breakfast on the go. And though Bircher muesli is called overnight oats, all you really need is several hours to let the oats soften sufficiently.

All it takes is just minutes to stir everything together the night before- brekkie is ready in the morning.

Packed with slow-release energy, protein, fruit and seeds, this easy overnight oats recipe is a complete breakfast to get your day started and keep you going until lunchtime. The recipe provides the base for countless variations - customize your Bircher muesli with any seeds and nuts, seasonal fruits, and choice of dairy or plant-based milk. The addition of chia seeds not only gives a major protein boost, it also gives the muesli a rich creaminess. Experiment with mixing in yoghurt, applesauce, or even nut butter. As far as toppings go, you can use just about anything your heart desires for fruit and nuts.

Bircher muesli is typically enjoyed chilled, making it perfect for warmer months
Ingredients
1 cup (100 g) whole rolled oats
1 1/2 tablespoon chia seeds
1 tablespoon pumpkin seeds
Small handful of dried cranberries, raisins, or goji berries
1 apple
1 1/2 cup milk of choice
A dash of pure vanilla extract, optional
A drizzle of maple syrup, optional

Directions
Peel and coarsely grate half the apple, reserving the other half for the morning. Combine all ingredients in a bowl and mix thoroughly. Cover and place in the fridge overnight or at least for 1 hour. When ready to serve, stir through the muesli and top up with a splash of milk if desired. Top with freshly grated apple, berries, nuts and seeds, granola or any toppings as desired or enjoy as it is!

Tried this recipe?
Share with me or leave a comment! #alvinspenthousekitchen 
Find me on Instagram @alvinckl and @alvin.penthousekitchen and follow my Facebook Fan Page!

【 什錦果麥早餐 】  


材料:
燕麥片               100 克
奇亞籽               1 1/2 湯匙
南瓜籽               1 湯匙
各式乾果           適量(蔓越莓、提子乾、杞子)
蘋果                    1 個
牛奶或植物奶  350 毫升
純雲呢拿香精  數滴(可免)
純楓糖漿           隨喜好(可免)

做法:
將半個蘋果去皮,刨成絲,另一半留起備用。把所有材料放入碗內,拌勻。蓋好後放入雪櫃存放一整夜或最少一小時。可存放三天。翌日享用時,拌勻並隨喜好加上新鮮蘋果、香蕉、各式鮮莓和堅果。


Tried this recipe?
Share with me or leave a comment! #alvinspenthousekitchen 
Find me on Instagram @alvinckl and @alvin.penthousekitchen and follow my Facebook Fan Page!

Wednesday, September 25, 2019

Peanut Butter, Date and Oat Bliss Balls | 椰棗燕麥能量球

If a granola bar and a chocolate peanut butter cookie dough had a love child, it would be this Peanut Butter, Date and Oat Bliss Ball. They are brown, shaped like meatballs, flecked with seeds, nuts, and specks of dried fruit, and are known interchangeably as energy balls. Typically found only behind display cases in those scarce health food-conscious cafes charging a whopping HKD30 a piece, these rather unadorned, ordinary-looking balls of joy may not immediately draw attention from Instagram-crazed foodies, much less do they receive the recognition they deserve. For those who have yet to be initiated into the world of energy balls, time to get onboard!

Bliss balls are not called "bliss" without a reason. Jam-packed with whole foods and super foods, bliss balls are chock full of nutrients with a satiating combination of proteins, good carbs, healthy fats, fiber - and flavor. They are a breeze to make, requiring no baking or cooking, can be made ahead in batches, and are fully portable - making them the perfect quick pre- or post-workout fuel, midday pick-me-up snack, or that perfect grab-and-go breakfast on those rushed mornings.

Two to three of these energy bites in the morning typically keep me full till lunch time so, in short, these babies are essentially the (almost entirely) guilt-free snack that can help keep hunger pangs at bay and conquer those sudden cravings for junk food which always, inevitably end with regret. Especially at 1am watching Will & Grace on Netflix.

This recipe takes advantage of dates as the natural sweetener and binder for the bliss balls and contains no added sugar or oil. And while dates, dried cranberries and raisins bring sweetness and tartness, dark chocolate and peanut butter rounds off every bite with an irresistible savoriness and familiar oompf. I like to use chunky peanut butter for added texture, but a smooth one will do as well. Bliss balls are fully customizable, so feel free to follow your heart's desire and experiment with your favorite ingredients! Switch peanut butter out for almond or other nut butters; toss in chopped nuts or chia seeds and hemp seeds for an extra boost of protein and essential fatty acids.

Need a quick snack on the go? These flavor-packed bliss balls are the perfect little boosts of energy!

What you'll need...
1 cup (200 g) pitted Medjool dates*
1 1/2 cup instant oats
1/3 cup peanut butter
2 teaspoon pure vanilla extract
1/4 cup warm water
1/3 cup sunflower seeds
2 tablespoons pumpkin seeds
1/4 cup dried cranberries
2 tablespoons raisins
2 tablespoons shredded coconut
35 g dark chocolate, chopped

Note: If the dates are dry, soak in warm water for 10 mins then drain well.

Directions...
1. In a food processor, pulse sunflower seeds and pumpkin seeds to break into smaller pieces. This is an important step to avoid whole seeds from jutting out or causing the energy bites to crumble. Set aside. Place the Medjool dates into the food processor and chop until small pieces remain or until a sticky mass forms.

2. In a small bowl, combine peanut butter, vanilla extract, and warm water until it reaches the consistency of honey. In a large mixing bowl, mix together all ingredients until well combined. Roll mixture into 1-inch balls and refrigerate for 1-2 hours or until firm. Store in an airtight container in the fridge for 3-4 days or freeze the balls. Enjoy on the go!

Tried this recipe?
Share with me or leave a comment! #alvinspenthousekitchen 
Find me on Instagram @alvinckl and @alvin.penthousekitchen and follow my Facebook Fan Page!

【 椰棗燕麥能量球 】


材料:
無核椰棗                200 克
即溶燕麥片            150 克
花生醬                    85 克
純雲尼拿香油         2 茶匙
溫水                        60 毫升
葵花籽                     5 湯匙
南瓜籽                     2 湯匙
蔓越莓乾                 4 湯匙
提子乾                     2 湯匙
椰絲                         2 湯匙
70% 巧克力             35 克

做法:
1. 葵花籽和南瓜籽用攪拌器輕輕打碎備用,有助減少能量球鬆散的機會。
2. 把椰棗放在攪拌器裡打碎至形成黏黏的一團。
3. 花生醬注入溫水和雲尼拿香油,拌勻。
4. 把所有材料拌勻,用手揉成球狀後冷藏 1-2 小時即可享用!

備註:若果椰棗感覺太乾,可先以溫水泡浸片刻。待軟化後瀝乾備用。

Tried this recipe?
Share with me or leave a comment! #alvinspenthousekitchen 
Find me on Instagram @alvinckl and @alvin.penthousekitchen and follow my Facebook Fan Page!

Tuesday, June 25, 2019

Sweet Potato and Bacon Waffles | 蕃薯煙肉窩夫

附中文食譜
Growing up, waffles were hardly part of my breakfast repertoire. We didn't grow up with a waffle maker at home. Although Hong Kong-style waffles were sold everywhere at hawker stands - generously slathered with peanut butter and condensed milk and sold side by side with egg puffs - I never really developed strong memories of waffles since street food was strictly off limits in my family.

Much in the same way as American style pancakes, waffles always felt to me like empty calories heavy with flour and laden with sugar - nothing more than a vehicle for the river of syrup or pat of butter, or the occasional bells and whistles.

Things started evolving for me when fried chicken and waffles became a thing in the U.S., something of a national obsession really. Don't get me wrong - chicken and waffles have been around for ages, with origins purportedly rooted in the South, but the formidable duo has seen a revival of late as brunch grew to become the top trend in American cuisine and beyond. In an instance, the humble waffle has been propelled to the center stage and under the global spotlight as an increasing number of restaurants worldwide are adding the combo to their menu and coming up with their own signature variations, be it savory or sweet. Waffles were no longer just for breakfast; neither are they simply just plain or sweet. My attitude towards waffles shifted. Next thing I know, I developed a craving for fried chicken and waffle and make a beeline for my favorite spot every time I land in New York.

End of last year, I picked up a multi-function sandwich maker at an appliances blowout sale that came with a waffle griddle. The machine hasn't seen daylight since until this past weekend when I decided a lazy "brunch for dinner" was in order for my little get-together with a couple of good friends. And by lazy, I mean it was just going to be waffle and gazpacho, no cooking required. I wanted the waffle to be the main event, something that was at once comforting, healthy, and satisfying. I also did not want flour to be the bulk of the waffle. So I looked to sweet potato - and sure enough - sweet potato waffles is a thing.

"Brunch for Dinner": a cozy, happy, celebratory weekend reunion!
Sweet potatoes are considered low on the glycemic index scale - meaning the carbohydrates are slowly digested, absorbed, and metabolized and do not cause a spike in insulin levels. Not only are these wholesome sweet potato waffles low in carbs and calories (make them even better for you without the bacon - but hey, baaaaacon), they are naturally gluten-free. Most recipes on the internet call for coconut flour to be incorporated into the mixture, but considering that in some parts of the world coconut flour is not readily available or is plain costly, I recommend other nut flours or cornstarch as a gluten-free substitute.


In this savory version of sweet potato waffles, bacon, spring onions and a touch of garlic powder give incredible flavor, while paprika brings subtle heat that plays off the mild sweetness in the sweet potatoes. Top the waffles with more crisp bacon, a gorgeous, runny sunny-side-up and a generous sprinkle of chopped spring onion, and finish with a light drizzle of maple syrup and hot sauce for a delicious sensory experience. Pair the ensemble with a refreshing, appetizing cup of gazpacho (recipe to come soon!) and you have a complete brunch suited for any time of the day!

What you'll need... (for two)
1 medium sweet potato (2 cups grated)
1 bunch spring onion, chopped
3 tablespoons cornstarch*
1 teaspoon paprika
1/2 teaspoon garlic powder
Large pinch of sea salt
1 slice bacon (optional)
2 eggs, beaten

To serve:
Bacon | Fried or poached egg | Avocado | Maple syrup | Hot sauce | Chopped spring onion

Note*: substitute with 2 tablespoons of coconut flour

Directions...
1. Peel and grate the sweet potato. Give the shredded sweet potato a few quick pulses in a food processor if necessary to break down any long strands. Important: lay grated sweet potato out on paper towels. Place another paper towel on top and press down to absorb as much liquid as possible.


2. Preheat waffle maker or waffle iron.

3. In a small frying pan, cook the bacon (if using) until desired crispiness, drain excess fat and crumble the bacon. In a large bowl, mix together all the waffle ingredients including the crumbled bacon until thoroughly combined.


4. Once the waffle maker is hot, grease with bacon fat or spray with nonstick spray. Spread sweet potato batter evenly onto the waffle maker, making sure it's packed down lightly. Close machine and let cook until golden brown and slightly crispy, flipping once if necessary, about 8 - 10 minutes. Remove and repeat with remaining batter.

5. While waffle is cooking, prepare toppings of choice. If making waffles in batches, lay cooked waffles on a rack and keep warm in an oven. Transfer to a plate and top with desired fixings, enjoy!

 【 蕃薯煙肉窩夫 】

一般的格仔餅啊!近年美國掀起炸雞窩夫熱潮、加上週末嘆 Brunch 的文化漸催普及化,窩夫不再只局限於早餐或作甜品~ 早餐當晚餐又何樂而不為呢? 用蕃薯製作的格仔餅鹹中帶甜,低卡高纖零麩質、不會令血糖飆升,配上培根煎蛋蘑菇和蕃茄凍湯,是完整完美的「早餐」啊!

材料(兩人份量):
蕃薯                                200 克
                                   1 小札
粟粉*                             3 湯匙
紅椒粉 (paprika)          1 茶匙
蒜粉                                1/2 茶匙
海鹽                                1/4 茶匙
煙肉                                1 片(可免)
雞蛋                                2 隻

伴碟:煙肉 | 太陽蛋 | 水煮蛋 | 牛油果 | 楓糖漿 | 辣醬 | 蔥花
備註*:粟粉可用 2 湯匙椰子粉代替,更為理想

做法:
1. 蕃薯去皮刨絲,建議用食物處理器把蕃薯絲略為打碎。
2. 蕃薯絲鋪在廚房紙上再放上另一層廚房紙,用力按壓,把多餘水份吸乾。
3. 煙肉煎香,切成碎片 (如使用)。
4. 雞蛋打成蛋液、蔥切成蔥花,保留少許綠色部分作裝飾用。
5. 把所有窩夫材料拌勻備用。
6. 窩夫機預熱,掃上少許油,鋪上適量蕃薯蛋漿,蓋好烘至呈金黃色和帶脆,約 8 - 10 分鐘。伴上自己喜歡的配料,即成!

備註:如分批製作窩夫,建議將弄好的窩夫平放焗爐架上用微溫保暖。

[Follow me on Instagram @alvinckl and @alvin.penthousekitchen and check out my Facebook Fan Page!]

Monday, May 20, 2019

Turkish Eggs | 土耳其式水煮蛋

附中文食譜
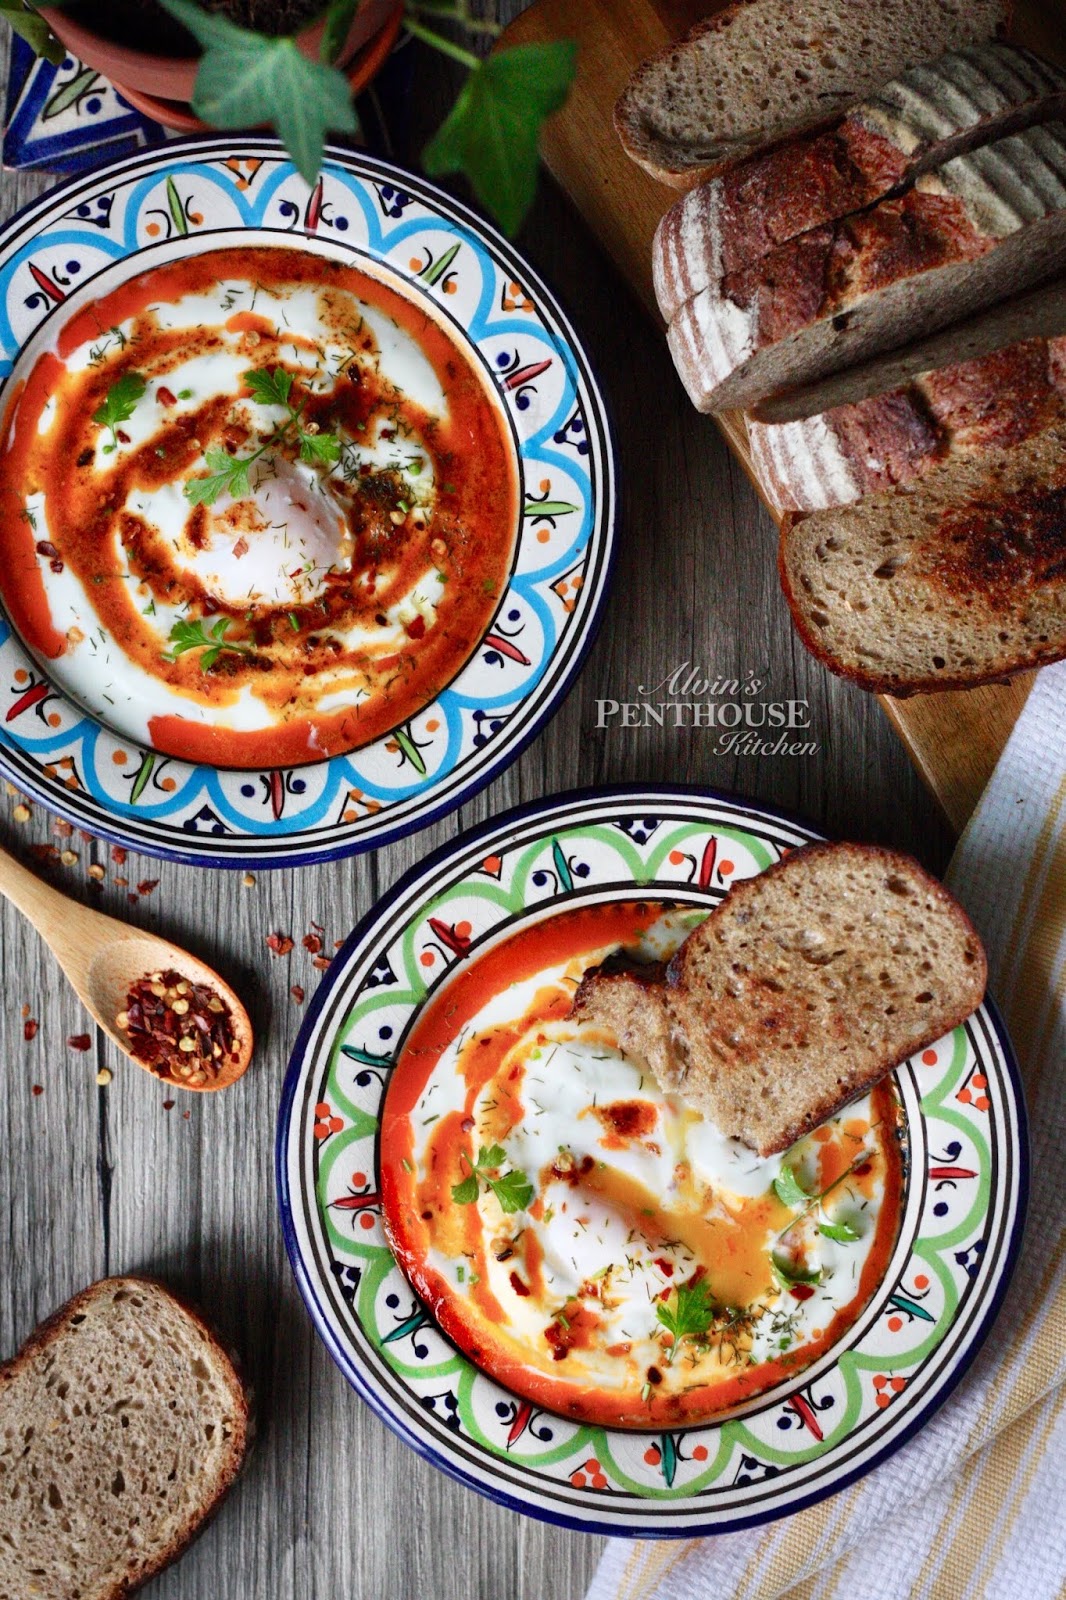
The first time I have ever tried Turkish eggs was, strangely, not in Turkey, but in Brisbane, Australia, at a cozy, two-storied cafe overlooking a sunny suburban street lined with boutiques and bakeries. To anyone who has never had Turkish eggs, or Çılbır, pronounced as "chulburr", the idea of laying a poached egg on Greek yogurt may raise an eyebrow or two. Add on top a drizzle of chili-infused melted butter, the concept seems to take "odd" farther up a notch. Creamy, tart, oozy, savory, then spicy, too? The idea of Turkish eggs appears to throw our notion of a familiar brunch into shambles.


But before you resort to the comfort zone with the likes of Eggs Benedict, I urge you to give this dish a try. Because with just one try it had got me hooked. The soft poached egg, with its silky egg whites, melds beautifully into a thick and creamy and slightly tart Greek yoghurt that is laced with garlic and sometimes dill. Butter is then melted and infused with chili then drizzled over the dish, imparting an extraordinary depth of flavor and giving a luxurious, aromatic kick. As you poke into the egg, luscious yolk oozes out like liquid gold, bringing the heavenly sensation to the next level. To scoop and soak up every last smear of yolk and yoghurt, thick, crusty, griddled sourdough or even warm naan would most certainly do the trick.

Word is that Çılbır originated as a breakfast staple in Eastern Turkey. I do not recall seeing this dish on menus around town in the iconic Istanbul (but then it was nearly a decade ago when I visited and I was mostly staying at budget guesthouses), but it is definitely making an increasing appearance at brunch restaurants around the world. A small breakfast cafe in West London easily charges this dish for £9, but you can just as easily prepare this dish at a fraction of the cost at home.

Aleppo (a mild Turkish red pepper flake) is traditionally used in making the chili-infused butter for this dish, but if unavailable, substitute paprika and a pinch of crushed red pepper flakes for no less a bang in flavor. While dill is not required on Turkish eggs, I personally find using some fresh or dried dill adds an uplifting herbaceous note and complexity to the dish.

After all, creamy, tart, oozy, savory, and spicy isn't just incredible; it is - in Nigella Lawson's words - "a revelation and a complete sensation."

What you'll need... (serves 2)
200 g Greek yoghurt
1/2 clove garlic
A few fronds of fresh dill, or a pinch of dried dill
2 tablespoons butter
1 tablespoon olive oil
1 teaspoon paprika
1 pinch crushed red pepper flakes
2 eggs
1 tablespoon white vinegar
Thick sourdough toast, to serve

Directions...
1. Using a fine grater, grate half a garlic clove and whisk into the Greek yoghurt with a small pinch of dried dill, if using. Set aside and allow the yoghurt to come to room temperature.

2. Gently melt butter in a small pan until it begins to turn into an aromatic, nutty brown. Stir in the olive oil, then add paprika and red pepper flakes and leave to infuse over a low heat. Turn heat off and set aside to cool.

3. Bring a pot of water to a simmer. Add the vinegar and make a swirl with a large spoon. Break cold egg into a small dish or saucer. Holding dish just above the simmering water, gently slip egg into the water. Poach for 3 mins until set, transfer egg with a slotted spoon to some kitchen paper to drain. Repeat with the other egg.

4. To serve, divide the yoghurt into two warm bowls, top each with a poached egg, then drizzle over the chili-infused butter. Season and scatter over some dill and crushed red pepper flakes and dig in with thick slices of crusty bread!

Note: I prefer grating the garlic here over finely chopped garlic as the flavor melds more readily into the yoghurt and it also reduces the chances of biting into pieces of raw garlic.

【 土耳其式水煮蛋 】


多年來眾人熟悉的 Eggs Benedict 一直被視為悠閒週末 brunch 之首選,是時候跳出框框了!話說有次在外國試過 Turkish eggs,嫩嫩的 poached egg 配上綿綿的香草乳酪再淋上香辣牛油,跟厚厚的吐司一起吃,味道配搭新奇刺激、口感一流,有別於傳統早餐菜式,可說是一見鍾情啊~ 急不及待回家研製、同大家分享食譜啊!

材料(二人份):
希臘乳酪                 200 克
蒜頭                         半瓣
刁草                         適量
牛油                         2 湯匙
橄欖油                     1 湯匙
紅椒粉 (paprika)    1 茶匙
乾辣椒碎                 適量
雞蛋                          2 隻
白醋                          1 湯匙
厚切酸種麵包        

做法:
1. 把蒜瓣磨成蓉。將乳酪、蒜蓉和少量刁草拌勻備用,待其回到室溫。
2. 牛油用慢火煮溶,期間會起泡。煮至牛油開始呈現咖啡色及聞到焦香後加入橄欖油、紅椒粉和乾辣椒碎。熄火,晾涼備用。
3. 大鍋燒滾水後轉慢火,加入白醋拌勻,用筷子輕輕攪出漩渦。小碗打入一隻雞蛋,小心把蛋倒入漩渦裡,煮約 3 分鐘後把水煮蛋盛起並放到廚房紙上吸乾水份
4. 把乳酪平均分配到兩個碗子裡後各放上一隻水波蛋。淋上辣椒牛油,再撒上刁草和乾辣椒碎,最後拌上厚切酸種麵包吐司即成!

[Follow me on Instagram @alvinckl and @alvin.penthousekitchen and check out my Facebook Fan Page!]


Thursday, February 8, 2018

Huevos Rancheros | 墨西哥農場煎蛋早餐

附中文食譜
For many people, a particular dish brings memories or harbors significant emotions. It could be your mom's hand wrapped dumplings, the ramen that you subsisted on during late-night college days, or even Jagerbombs (just the thought of it makes my insides turn - I will spare you on the details).

I remember my very first taste of huevos rancheros, a humble, staple Mexican desayuno freshly cooked up in a community kitchen where we started our days volunteering for Habitat for Humanity in an impoverished neighborhood in Ciudad Juarez, Mexico.

That was now nearly fifteen years ago, I then a more rotund college Junior, criminally misinformed and ignorant about Mexican cuisine after years of cattle-feeding on soupy enchiladas and goopy "salsa" poured out from factory-sized tubs a.k.a. high school lunch grub. These huevos rancheros were vibrant in color, the frijoles refritos soul-warming, the sunny-side-up perfectly crisped on the edges, the spicy red salsa fresh and well-balanced, and the tortilla underneath them all golden and crunchy. It had me asking for more. It was something I have never had before. A moment of revelation, a culinary discovery. Had I have a smartphone back then (those were the days before terms like selfies and food porn came to be), I would have most likely snapped one too many photos. Fortunately, the memories and experience live on. I can still recall the face of the lady who lovingly prepared and served us meals, her painted, arched eyebrows, her wide smile, and warmhearted hospitality.


Fire-roasted tomatoes for maximum flavor
Fifteen years later, I finally put this itch to rest. I have been procrastinating for too long to revisit this memory. And thus I picked up a few things from the groceries on my recent layover in Los Angeles, scoured through my pantry, invited a dear friend over to be my guinea pig, and made huevos rancheros.

Huevos rancheros - "rancher's-style" eggs - are basically eggs served on a corn tortilla with a spicy tomato-chili salsa - a simple, stress-free, quick affair with minor variations in accompaniments across different households and regions. I like mine served with refried black beans ('coz why not?) for extra fiber and dimension, just like how I remembered. The tortilla can be either crunchy fried (more like a tostada) or lightly charred according to preference, so long it holds the wet sauce without disintegrating into mush.

Chile Guajillo, adds depth and smokiness
For the recipe, I base mine mostly on J. Kenji Lopez-Alt's from Serious Eats. For the red sauce, make use of tinned tomatoes to make your life easy - if you can find fire-roasted tomatoes in a can, all the better. I followed his suggestions and tossed in toasted Mexican dried chilies (I happen to have dried Guajillo chilies sitting in the back of my cramped pantry) for extra depth and smokiness. Substitute with Chinese dried chilies or crushed red pepper if unavailable. To finish the dish, top with crumbled cheese, cilantro, avocado, sliced cherry tomatoes, fresh jalapeños and add a side of Mexican street corn as desired.

A fiesta for the eyes, a party for your tastebuds!
What you'll need...
1 medium onion, finely sliced
3 cloves garlic, roughly chopped
1-2 whole dried Mexican chilies (ancho, guajillo, or morita)*
1/2 teaspoon dried oregano, preferably Mexican
1/2 teaspoon ground cumin
1 14 oz. (400 g) can crushed tomatoes, preferably fire-roasted
2 whole chipotle chilies packed in adobo from can
1/4 cup minced fresh cilantro, stem and leaves, plus more for serving
Squeeze of lime juice, plus lime wedges for serving
1 tablespoon soy sauce
Fresh corn tortillas
Eggs
Canned or homemade black or pinto refried beans, heated, for serving
Crumbled Cotija cheese^, for serving
Avocado, for serving (optional)
Sliced cherry tomatoes, for serving (optional)

Notes:
* If not available, substitute with Chinese dried chilies or crushed red pepper flakes.
^ I used crumbled queso fresco. If neither are available, substitute with crumbled feta cheese.

Directions...

1. Trim tops off the dried chilies and discard seeds. Pop into microwave and heat on High for 15 minutes until softened and fragrant. Snip into thin strips and set aside.


2. In a medium saucepan, heat oil and add onion and garlic, stirring occasionally, until softened and just starting to brown, about 5 minutes. Add oregano, cumin, and chili strips and cook until fragrant, about 15 seconds. Add tomatoes and chipotle chilies with their sauce and bring to a simmer. Reduce heat to a gentle simmer for 10 minutes.


3. Puré mixture with an immersion blender or in a blender. Stir in cilantro, soy sauce, a squeeze lime, and season to taste with salt and pepper. Set aside and keep warm.

4. In a cast iron skillet or non-stick pan, heat oil and lightly fry corn tortillas one at a time, until lightly charred on each side but still pliable. Transfer to a paper towel to drain and stack them as you go. Cover with foil to keep warm.

5. Using the same skillet or separate pan, heat oil over medium-high heat until oil is shimmering. Fry eggs, using a spoon to baste the tops with hot oil as they cook in order to help set the upper whites while keeping the yolk completely runny. Fry until crisp on the bottom and edges and whites are set. Season with salt and pepper.

6. To serve, smear refried beans on each tortilla, top with a fried egg, and spoon salsa over the top, keeping the yolk exposed. Finish with a sprinkle of cotija cheese, sliced cherry tomatoes, and minced cilantro a Enjoy immediately. Buen provecho!

《墨西哥農場煎蛋早餐》


這一頓簡單而豐富的早餐,就是十五年前令我對墨西哥地道菜一見鍾情的那一道菜式。
十五年後的我終於重溫當年在墨西哥當義工時吃過的一頓難忘的早餐。

材料:
洋蔥  1 小個  切絲
蒜頭  3 瓣  剁碎
墨西哥乾辣椒  1 - 2 隻(ancho/guajillo/morita/或用一般辣椒乾代替)
乾奧勒岡  半 茶匙(墨西哥的品種最為理想)
小茴香粉  般茶匙
罐裝番茄  400 克(fire-roasted 的最為理想)
罐裝墨西哥 chipotle 辣椒 in adobe sauce  2 條
芫荽(剁碎)7 克
新鮮青檸汁  少量
生抽  1 湯匙
墨西哥玉米捲餅皮
雞蛋

自選配料:
罐裝豆泥
Cotija 芝士碎(或用 feta 芝士代替)
芫荽碎
牛油果
車厘茄  切片

做法:
1. 墨西哥乾辣椒先去頭去籽,放進微波爐以強波叮 15 秒至軟化和帶香。用剪刀把辣椒剪成絲,備用。

2. 小煲中落油炒香洋蔥和蒜頭,約 5 分鐘。加入乾辣椒絲、奧勒岡和小茴香粉,炒約 15 秒後再加入罐裝番茄和 chipotle 辣椒。煮開後轉小火加蓋燜煮 10 分鐘。

3. 用手持式攪拌捧或攪拌機把煲中食材打成蓉。拌入芫荽、生抽和青檸汁再作適當調味。備用。

4. 鑄鐵鍋或易潔鍋中落油把捲餅皮逐一煎至輕微焦香及軟中帶脆,並用錫紙保溫。

5. 煎太陽蛋。

6. 完成品製作步驟:煎好的捲餅皮上先塗上一層豆泥,然後放上一隻太陽蛋,再淋上番茄辣椒莎莎醬(不要完全覆蓋太陽蛋啊,特別是蛋黃啊!),最後撒上芝士碎、芫荽、車厘茄,牛油果和青檸角拌碟,完成!

[Follow me on Instagram @alvinckl and @alvin.penthousekitchen and check out my Facebook Fan Page!]