Showing posts with label Dessert. Show all posts

Wednesday, July 22, 2020

Banana Bread French Toast, Candied Walnuts and Banana Brûlée | 法式香蕉蛋糕西多士

附中文食譜
Overripe bananas? Make banana bread. Bored of plain banana bread? Make banana bread French toast! For the longest time, banana bread is the obvious solution to an over-abundance of bananas that may have past their retail prime, but now, there is a very real reason to make a loaf with all intents and purposes.

The first time I've had banana bread French toast was at a little cafe in the suburbs of Brisbane, Australia. The thick, golden, battered slice came topped with a generous scoop of house-made ice-cream and a crunchy nut streusel then drizzled with local honey. One bite and the rest was history. I swore this would go on the menu were I to open up a cafe one day. Even if that does not happen eventually, the fantasy lives on.

As banana bread is already naturally sweet, no additional sugar is necessary in the milk and egg batter
Brunch just got sexier: treat yourself to a heavenly brunch with this French toast with a scrumptious twist!
Switching up regular toast with banana bread adds a scrumptious twist to this weekend brunch classic. The tender, moist cake makes a wonderful canvas that soaks up the milk and egg batter, seamlessly marrying the aroma of sweet banana with the warmth of cinnamon and vanilla. It is simply heavenly pan-fried in a generous dose of butter. Now, one could opt to stop right there with just French toast with perhaps a drizzle of maple syrup, a light dusting of confectioners sugar, or a side of fresh berries. But as they say, go big or go home - why not take this up another notch?

As banana bread has a relative high moisture content, you may find that it never quite crisps up as much as stale bread when making French toast. It gives us all the more reason to pair banana bread French toast with additional toppings that bestows just that extra va-va-voom it needs.

Think sticky candied walnuts that adds an irresistible crunch and toasty flavor; and torched banana that brings a delicate smokiness to the palate.

Banana bread French toast just went from sexy to sensational. And if that still doesn't suffice? Make it a-la-mode: top it all with a generous scoop of vanilla ice-cream. And if that still doesn't do the trick? Give it a drizzle of dark rum. That, I believe, should hit it out the ball park.

Torching not only takes away the raw edge in the banana, but also adds a tantalizing smokiness to the ensemble

Now, this may not be your typical low-calorie brunch. But let's face it - no one's exactly thinking of going on a diet when making French toast. Rather, I say, why not make each French toast count?

To make this banana bread French toast, you will need to first make banana bread. Get the recipe here (day-old banana bread is even better!):
Classic Banana Bread

Ingredients: Servings for 2
Banana Bread French Toast
4 slices banana bread, sliced 1-inch thick
1 egg
1/4 cup whole milk
Drizzle of vanilla extract
1/4 teaspoon ground cinnamon
1 tablespoon butter

Quick Candied Walnuts
A palmful of walnuts (approx. 25g)
Drizzle of vegetable oil
1 teaspoon brown sugar
1 teaspoon honey

Banana Brûlée
1 ripe but firm banana
Brown sugar

Directions
Banana Bread French Toast
Whisk the egg, milk, cinnamon and vanilla extract in a shallow dish. Dip the banana bread slices into the egg mixture, coating both sides and let soak for 1 minute on each side. Heat butter in a large skillet over medium heat. Add the banana bread slices to the skillet and cook until golden, about 2 to 3 minutes per side. Repeat with remaining slices.


Quick Candied Walnuts
Preheat oven to 220°C/425°F. Coat walnuts with oil, brown sugar, and honey. Transfer nuts to a parchment-lined baking sheet and roast for 7-8 minutes until golden and bubbling. Keep an eye on them once you smell the fragrance of roasted nuts as they burn quickly. Remove from oven and let cool to form the crunchy glaze.


Banana Brûlée
Choose firm, just-ripe bananas so they don't fall apart. Slice bananas into half-inch coins. Arrange on a heat-proof dish and sprinkle brown sugar liberally over the surfaces. Use butane torch to brûlée, moving the flame evenly back and forth over the sugar coating until caramelized.


Stack banana bread French toast and scatter candied nuts and torched banana over the top. Finish with a drizzle of honey or maple syrup and some fresh berries on the side. For an extra decadent treat, add a generous scoop of vanilla ice-cream. Bon appétit!

What's your favorite topping on a French toast?
Share with me or leave a comment below! Tag #alvinspenthousekitchen.
Find me on Instagram @alvinckl and @alvin.penthousekitchen and follow my Facebook Fan Page!

【 法式香蕉蛋糕西多士 】


材料:
香蕉蛋糕西多士
香蕉蛋糕                     4 件,各 1 寸厚(食譜按此
雞蛋                             1 隻
鮮奶                             60 毫升
雲尼拿香油                少量
肉桂粉                        1/4 茶匙
牛油                            15 克

糖衣烤核桃
核桃                              25 克
菜油                              少量
黃糖                              1 茶匙
蜂蜜                              1 茶匙             

焦糖火炙香蕉
香蕉                              1 隻
黃糖                              少量

做法:
香蕉蛋糕西多士 
1. 雞蛋、鮮奶、肉桂粉和雲尼拿香油加入打勻,放入淺碟中。
2. 香蕉蛋糕浸入蛋液中,每面浸約一分鐘,直至徹底吸滿蛋液。
3. 牛油放入平底鑊中煮溶,放入蛋液香蕉蛋糕,以中火半煎炸至兩面金黃,盛起

糖衣烤核桃
1. 預熱焗爐至 220°C / 425°F。核桃跟油、黃糖和蜂蜜拌勻。
2. 轉放在鋪了烘培紙的焗盤上,焗約 7-8 分鐘。烘好取出晾凉。

焦糖火炙香蕉
1. 選用剛熟而不軟身的香蕉,切成半寸厚的圓片,鋪在耐熱的器皿上。
2. 撒上黃糖,以火槍燒至糖分融化。

在香蕉蛋糕西多士上撒上糖衣烤核桃和焦糖火炙香蕉,再隨喜好淋上蜂蜜或楓糖漿。如欲增加邪惡感,可再添加一球雲尼拿雪糕!

What's your favorite topping on a French toast?
Share with me or leave a comment below! Tag #alvinspenthousekitchen.
Find me on Instagram @alvinckl and @alvin.penthousekitchen and follow my Facebook Fan Page!

Thursday, May 21, 2020

Classic Banana Bread | 香蕉蛋糕

The first thing I ever baked was a banana bread. That goes to show that making banana bread is about as easy as baking can get - so long as you have bananas that are so ripe and freckled they would have otherwise ended up in the reject pile at the supermarket.
While some people make banana bread only as a way to use up forgotten bananas, others like me routinely stake out at the quick sale corner hunting precisely for these often orphaned, blemished, and (heavily discounted) overripe bananas - for none other than to bake the most impossibly scrumptious and moist homemade banana bread. After all, banana bread is half the reason why bananas exist, right?

Over the years I have carried banana bread to the office at my first desk job; brought a slice or two to my hairdresser and bribed a security guard; shared with my fellow chirpy flight attendants during boot camp training as a new recruit; and on countless occasions served it at housewarmings, game nights, or simply as an afternoon treat. Over time, friends, neighbors, co-workers have fallen in love with this banana bread. Some even declared it a favorite.

Banana bread can be something rather ordinary, a usual suspect at coffee shops everywhere; it is so basic and so ubiquitous yet so universally loved it's almost uncanny. Abundant as they are, however, some banana bread may turn out dry, overly sweet or, worse yet, taste of artificial flavoring. What makes homemade ones extraordinary and sets it apart from commercial ones is its texture, the moist and soft crumb, the incredibly rich color and buttery aroma, and the unmistakable natural sweetness from ripe bananas.

Year after year I swear by this simple recipe, deviating only in experimentation with different combinations of sugars. I tend to gravitate towards using brown or even black sugar to imbue the cake with a rich, caramelly flavor and moisture, but also mixing in white sugar just to provide enough sweetness without overpowering the banana flavor. Using white sugar alone will produce a paler banana bread with a more single-noted flavor. The sugar amount is flexible. Most recipes call for one full cup of sugar, but I find 3/4 cup to be just perfect - or even less if you are using very, very ripe bananas or upping banana count to four.

As far as baking goes, banana bread is by far the most beginner-friendly. It is the simplest and most forgiving, especially for someone like me who detests precise measurements and flinch at the thought of baking an angel food cake. There may be plenty of ways to fancy up a good old banana bread; you can add walnuts, pecans, chocolate chips, dark rum, all of which I've tried - but some of my best bakes are the ones that were kept simple and classic. Sometimes simplicity is best (I am a bit of a purist when it comes to banana bread).

Ordinary as it may be, banana bread is surely well loved by all and oddly so it is also one of my most requested recipes from friends. This is my go-to favorite recipe for banana bread, one that I have written out on a loose piece of junk paper and which I have cherished over the years. Calling this the "best-ever" banana bread may be a bold statement, but I am here to admit it might just be the best banana bread you've ever had. It will surely make you go bananas!


Ingredients
1 1/2 cup (195 g) plain flour
1 teaspoon baking soda
1/2 teaspoon salt
3 large overripe bananas
1/2 cup (115 g) unsalted butter, softened
1/2 cup brown sugar
1/4 cup white sugar
2 eggs
1/2 teaspoon vanilla essence

Directions...


Preheat oven at 350F/180C. Cream together the butter and sugar. Crush bananas with a fork or a masher. Add eggs and vanilla essence and combine well with the butter and sugar mixture.

Sift together flour, baking soda, and salt. Fold into creamed mixture. Pour into greased loaf pan. Bake for 50-60 minutes or until toothpick comes out clean.

Do you like your banana bread plain or with nuts?
Share with me or leave a comment below! Tag #alvinspenthousekitchen.
Find me on Instagram @alvinckl and @alvin.penthousekitchen and follow my Facebook Fan Page!

 【 香蕉蛋糕 】


材料:
中筋麵粉               195 克
蘇打粉                   1 茶匙
幼鹽                        1/2 茶匙
無鹽牛油               115 克
紅糖                        110 克
砂糖                        50 克
熟透香蕉               3 條(大)
雞蛋                        2 隻
雲呢拿香油          1/2 茶匙

做法:
1. 預熱焗爐至 350F/180C。
2. 牛油放於室溫軟化,加入糖用攪拌器攪拌至均勻幼滑。
3. 香蕉放在碗裡用叉子壓成泥狀,可以保留一點顆粒口感。
4. 加入雞蛋和雲尼拿香油拌勻,然後跟牛油和糖拌勻。
5. 加入過篩後的麵粉、鹽和蘇打粉,輕輕攪拌均勻。
6. 把粉漿倒入已掃油的糕盤內,放入焗爐焗約 50-60 分鐘至金黃熟透即可。

Do you like your banana bread plain or with nuts?
Share with me or leave a comment below! Tag #alvinspenthousekitchen.
Find me on Instagram @alvinckl and @alvin.penthousekitchen and follow my Facebook Fan Page!


Thursday, April 2, 2020

Steamed White Sugar Sponge Cake | 傳統白糖糕

附中文食譜
The classic Chinese steamed white sugar sponge cake is a childhood favorite for many, and it is no exception for me growing up in 1990's Hong Kong. The sheer thought of this humble street snack brings back many sweet memories - of my mother always buying me a couple of slices every time she visited the wet market; and me always looking at her with puppy eyes whenever we passed by a shop selling the familiar triangular slices. It is a symbol of joy in its simplest form.

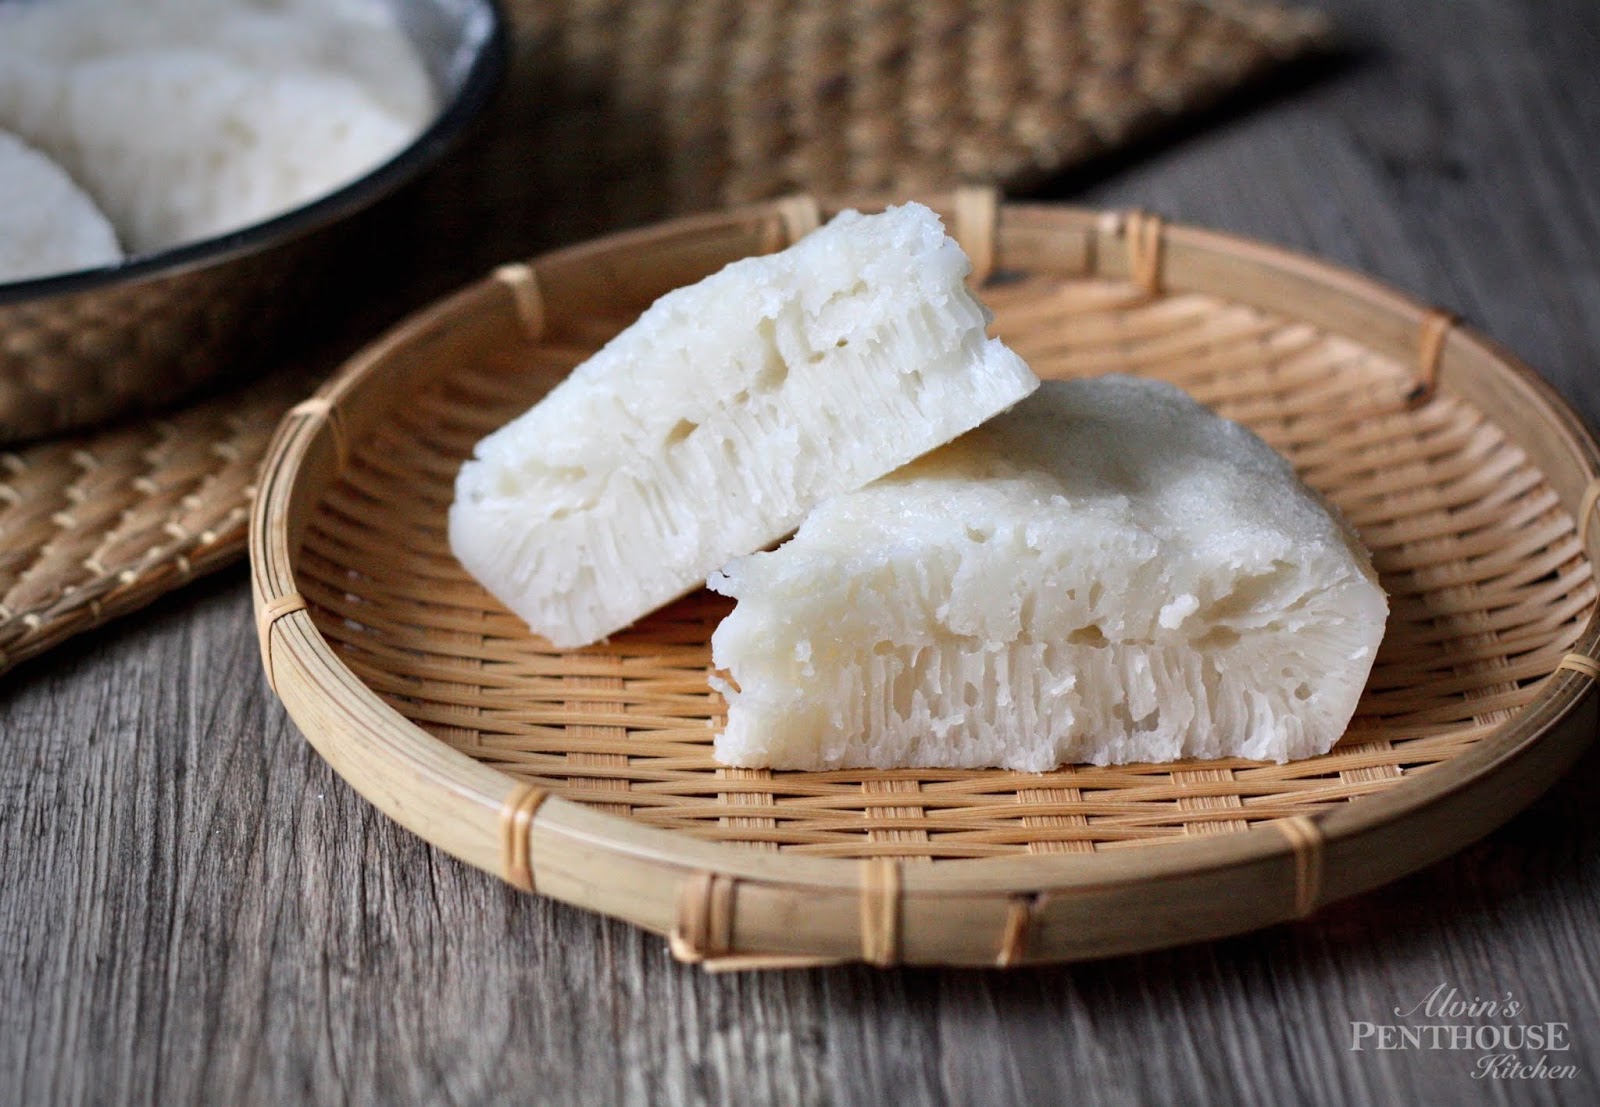
The steamed white sugar sponge cake (白糖糕, bak tong gou) is light and fluffy, glossy and slightly sticky to the touch, and moist and springy on the inside. It is sweet - but not tooth-achingly sweet, with a faint floral aroma that reminds of sweet rice wine and fermented glutinous rice that I adore (even as a child) and later come to recognize as yeast. Tearing into the cake would reveal an intricate honeycomb-like columnar structure that I always, to this day, find absolutely fascinating.

I may have since then left home for the United States for school for a number of years and not had bak tong gou for ages, but my affinity for this childhood favorite never weakened. Even upon my return to Hong Kong, I always made a stop at this old hawker who sold all kinds of traditional homemade confections from a little cart on Wellington Street, Central. This old hawker would have long gone by now. And with this old gentleman being quite possibly the very last hawker vending traditional sweets under the government's non-transferable itinerant hawker license, bak tong gou and the like will now be only found at handfuls of traditional bakeries, congee shops, and occasional dim sum lunches across town. The fond memories that many of us share of this childhood favorite, however, never fades.

Making the steamed white sugar sponge cake at home is really rather simple. With such a simple and inexpensive ingredient list, making this cake yourself and revisiting the memory lane might in fact be easier than finding this cake on the streets these days. As the name suggests, bak tong gou calls for granulated white sugar, giving the cake that pure white appearance that becomes slightly off-white only with the addition of yeast. Using brown sugar would create a sister version of the sponge cake, (黃糖糕) wong tong gou, or as Hong Kongers call it - steamed yellow sugar sponge cake. And like many traditional Chinese cakes, the sponge cake is steamed rather than baked.

The yeast gives the steamed sponge cake a distinct, honeycomb-like columnar texture and appearance
I have tried different methods and measurements for making the bak tong gou, and the one I share here by far trumps all others when it comes to effort and ease. Conventional approach will suggest cooking the rice flour mixture together with the sugar syrup over low heat on the stove top, which would require rigorous stirring and a greater attention span to prevent lumps from forming. I have also tried the double-boiler method which, while providing less direct heat, likewise requires continuous stirring. Instead, to make life and an already easy recipe a whole lot easier (who doesn't like the sound of that?), simply dissolve the sugar and yeast in warm water and add them to the rice flour mixture and give that a good stir, and the mixture is ready to rest.

Bak tong gou should taste sweet but not sour, which is a sign of over fermentation
By doing this, not only will you save loads of time from having to wait impatiently for the mixture to cool down before adding the yeast (lest you kill the yeast), you also spare a whole lot of elbow grease and the risk of ending up with undesirable lumps in the batter. Boom, an easy recipe just made even easier.

After putting together the batter, it is to be simply left covered for hours to allow the yeast to do its thing. The exact amount of time varies with ambient temperature, ranging anywhere from three hours in summer up to seven in colder months. Following the below technique will significantly cut the idle time, regardless the season.

I have long been known to detest precise measurements in the kitchen, relying almost too wholeheartedly on "the senses" and cups and tablespoons and only reluctantly pulling my kitchen scale out when converting recipes into metric units when called for. Most recipes online for the steamed sponge cake come in metric unit. Fortunately, the steamed sponge cake is very forgiving to minor mathematical errors. Out of convenience, here I provide both measurements in cups as well as grams or millimeters. From here on out, with this recipe finally consolidated and added to my collection, I am rejoicing that my kitchen scale can rest in peace inside the cabinet whenever I make bak tong gou. Perhaps I would be making this cake and walking down the memory lane more often from now on!

Ingredients...
1 cup warm water, divided
1 cup water
2 cups (280 g) rice flour
3/4 cup (150 g) white sugar, divided
2 teaspoons active dry yeast
1/4 teaspoon vegetable oil

Proofing the yeast & making the batter
1. Transfer 1/4 cup of the warm water into a cup or bowl. The water should be around or just slightly higher than body temperature (roughly 100°F/38°C) and not hot to the touch. Tip in the active dry yeast along with 1/2 teaspoon of the sugar, stir well and let rest for 10 minutes or until foamy.

2. In a large mixing bowl, combine the rice flour and 1 cup of water (room temperature). Stir until thick and smooth.

3. Add sugar to the remaining 3/4 cup of warm water and mix well until sugar dissolves. Check that the syrup is close to body temperature and not hot to the touch.

4. Add the yeast mixture and syrup to the flour mixture and stir well to combine. Cover with cling wrap and place inside a microwave or oven along with two cups of boiling water to generate heat. Close the door and let the batter rest for 2 hours or until large bubbles form on the surface of the batter. Refresh the boiling water to speed up the process if needed.


Steaming the cake
1. Grease a 9-inch round cake pan generously with oil. Once the batter is ready, remove from the oven, stir well, and transfer batter to a large measuring cup. Add vegetable oil and stir to combine.

2. For a smoother cake surface, pour batter over a strainer into the cake pan and discard the foam. Steam over high heat, covered with the lid wrapped with a tea towel, for 25 minutes.

3. Turn the heat off and allow the cake to rest in the steamer for 10 minutes with the lid off. Remove cake from the steamer and let cool for another 10 minutes on the counter. Slice and enjoy fresh at its best!

Note: Cover and store at room temperature for up to 24 hours. After that, refrigerate for up to 4 days. To reheat, steam gently.

Is Bak Tong Gou also your childhood favorite?
Share with me or leave a comment below! Tag #alvinspenthousekitchen.
Find me on Instagram @alvinckl and @alvin.penthousekitchen and follow my Facebook Fan Page!

【 傳統白糖糕 】

細對白糖糕就有著一種情意結。想當年媽媽知道我最愛白糖糕,每次落街市都會買來給我吃;人大了,白糖糕依然充滿著童年回憶。別看白糖糕外表平凡,一件好的白糖糕雪白晶瑩、味道清甜芳香而不酸、入口爽滑而稍韌,難怪令人難以抗拒。自家製白糖糕十分簡單,經過屢次改良,終於研製出以下最簡易、最省時、零失敗的食譜跟大家分享、一起懷緬童年!

材料:
溫水*                      240 毫升
清水                        240 毫升
粘米粉                    280 克
砂糖                        150 克
即溶酵母                2 茶匙
菜油                        1/4 茶匙

做法:
1. 先用 60 毫升溫水來開即溶酵母,加入半茶匙砂糖,拌勻備用約 10 分鐘。
2. 粘米粉及清水拌勻至輕微黏稠狀,備用。
3. 剩餘砂糖與溫水攪勻至完全溶解。
4. 將發好起泡的酵母和糖水加入粘米粉漿內拌勻。
5. 蓋上保鮮紙,連同 2 杯滾水放置在微波爐或焗爐裡面發酵 2 小時,直至粉漿出現大氣泡。滾水會製造蒸氣熱力,有助粉漿在受控的環境下迅速發酵。
6. 發酵好的粉漿加入菜油拌勻,隔篩(隔除過量氣泡,白糖糕表面會更加光滑)倒入已掃油的圓形不鏽鋼碟內,用大火蒸約25分鐘。
7.  熄火開蓋,待涼約 10 分鐘後把白糖糕取出再晾涼約 10 分鐘後切件即成!

備註:
1. *注意暖水溫度應接近或輕微高於體溫,不應燙手,不然會「殺死」酵母。
2. 家中如有蒸籠,可以用蒸籠去蒸,不然可以用毛巾包著煲蓋隔水蒸,有助防止倒汗水滴在糕面,影響製成品。
3. 正宗白糖糕其實不該帶有酸味,而酸味可能來自發酵過度。

Is Bak Tong Gou also your childhood favorite?
Share with me or leave a comment below! Tag #alvinspenthousekitchen.
Find me on Instagram @alvinckl and @alvin.penthousekitchen and follow my Facebook Fan Page!

Wednesday, September 25, 2019

Peanut Butter, Date and Oat Bliss Balls | 椰棗燕麥能量球

If a granola bar and a chocolate peanut butter cookie dough had a love child, it would be this Peanut Butter, Date and Oat Bliss Ball. They are brown, shaped like meatballs, flecked with seeds, nuts, and specks of dried fruit, and are known interchangeably as energy balls. Typically found only behind display cases in those scarce health food-conscious cafes charging a whopping HKD30 a piece, these rather unadorned, ordinary-looking balls of joy may not immediately draw attention from Instagram-crazed foodies, much less do they receive the recognition they deserve. For those who have yet to be initiated into the world of energy balls, time to get onboard!

Bliss balls are not called "bliss" without a reason. Jam-packed with whole foods and super foods, bliss balls are chock full of nutrients with a satiating combination of proteins, good carbs, healthy fats, fiber - and flavor. They are a breeze to make, requiring no baking or cooking, can be made ahead in batches, and are fully portable - making them the perfect quick pre- or post-workout fuel, midday pick-me-up snack, or that perfect grab-and-go breakfast on those rushed mornings.

Two to three of these energy bites in the morning typically keep me full till lunch time so, in short, these babies are essentially the (almost entirely) guilt-free snack that can help keep hunger pangs at bay and conquer those sudden cravings for junk food which always, inevitably end with regret. Especially at 1am watching Will & Grace on Netflix.

This recipe takes advantage of dates as the natural sweetener and binder for the bliss balls and contains no added sugar or oil. And while dates, dried cranberries and raisins bring sweetness and tartness, dark chocolate and peanut butter rounds off every bite with an irresistible savoriness and familiar oompf. I like to use chunky peanut butter for added texture, but a smooth one will do as well. Bliss balls are fully customizable, so feel free to follow your heart's desire and experiment with your favorite ingredients! Switch peanut butter out for almond or other nut butters; toss in chopped nuts or chia seeds and hemp seeds for an extra boost of protein and essential fatty acids.

Need a quick snack on the go? These flavor-packed bliss balls are the perfect little boosts of energy!

What you'll need...
1 cup (200 g) pitted Medjool dates*
1 1/2 cup instant oats
1/3 cup peanut butter
2 teaspoon pure vanilla extract
1/4 cup warm water
1/3 cup sunflower seeds
2 tablespoons pumpkin seeds
1/4 cup dried cranberries
2 tablespoons raisins
2 tablespoons shredded coconut
35 g dark chocolate, chopped

Note: If the dates are dry, soak in warm water for 10 mins then drain well.

Directions...
1. In a food processor, pulse sunflower seeds and pumpkin seeds to break into smaller pieces. This is an important step to avoid whole seeds from jutting out or causing the energy bites to crumble. Set aside. Place the Medjool dates into the food processor and chop until small pieces remain or until a sticky mass forms.

2. In a small bowl, combine peanut butter, vanilla extract, and warm water until it reaches the consistency of honey. In a large mixing bowl, mix together all ingredients until well combined. Roll mixture into 1-inch balls and refrigerate for 1-2 hours or until firm. Store in an airtight container in the fridge for 3-4 days or freeze the balls. Enjoy on the go!

Tried this recipe?
Share with me or leave a comment! #alvinspenthousekitchen 
Find me on Instagram @alvinckl and @alvin.penthousekitchen and follow my Facebook Fan Page!

【 椰棗燕麥能量球 】


材料:
無核椰棗                200 克
即溶燕麥片            150 克
花生醬                    85 克
純雲尼拿香油         2 茶匙
溫水                        60 毫升
葵花籽                     5 湯匙
南瓜籽                     2 湯匙
蔓越莓乾                 4 湯匙
提子乾                     2 湯匙
椰絲                         2 湯匙
70% 巧克力             35 克

做法:
1. 葵花籽和南瓜籽用攪拌器輕輕打碎備用,有助減少能量球鬆散的機會。
2. 把椰棗放在攪拌器裡打碎至形成黏黏的一團。
3. 花生醬注入溫水和雲尼拿香油,拌勻。
4. 把所有材料拌勻,用手揉成球狀後冷藏 1-2 小時即可享用!

備註:若果椰棗感覺太乾,可先以溫水泡浸片刻。待軟化後瀝乾備用。

Tried this recipe?
Share with me or leave a comment! #alvinspenthousekitchen 
Find me on Instagram @alvinckl and @alvin.penthousekitchen and follow my Facebook Fan Page!

Monday, April 29, 2019

Peach Gum Dessert Soup with Red Dates, Longan, and Lotus Seeds | 紅棗桂圓雪蓮子桃膠糖水

附中文食譜

Of all the health food fads that saturate our pantries and social media these days, peach gum - a relatively recent Chinese beautifying food sensation - is surely one to stay. Peach gum (桃膠) has been making increasing appearance on shelves in health food stores and on dessert menus across town, and it did not take me long to finally give in and snatch myself a bag of this curious gemstone-lookalike when I saw some on sale at a food fair.

Serve this dessert hot for a nourishing treat or chilled for a refreshing twist
A little goes a long way: peach gum expands drastically when soaked in water
Peach gum, also known by its winsome moniker "peach blossom tears", is essentially the sap secreted from the bark of the peach tree which is harvested in its crystalline form. Naturally cholesterol-free and rich in amino acids, collagen, and soluble fiber, peach gum is widely touted for its (almost mythological) skin-beautifying power and certain curative qualities. Often likened to the coveted but controversial bird's nest in terms of properties and nutritional value, and with a texture similar to hasma, it is no wonder why peach gum - available at a fraction of the cost of other Chinese delicacies - is gaining such popularity around the world, especially among women.

What makes peach gum so good? It's cheap, and no animal cruelty is involved. I like the sound of that.
Peach gum, when soaked in water overnight, expands astonishingly in size. Read: a little goes a long way! These amber-hued, gem-like crystals plumps up into translucent clouds that are at once soft and dense to the bite, with a gelatin bouncy texture that reminds of aiyu jelly ubiquitous in Taiwanese desserts and beverages. As peach gum is generally tasteless, it features well in many desserts and soups, sometimes even stews. With as few as six crystals being plenty for a single serving, a bag of peach gum could last a remarkably long time, which translates into incredible value.

As peach gum is believed to have cooling properties in traditional Chinese medicine, cooking peach gum with dried longan and red dates give balance to this dessert
Peach gum is believed to be beneficial to both our stomach and skin
Whilst all sounds too fantastical to be real, the cleaning process, inevitably, does require some patience and time. I find rinsing the peach gum and replacing the water every now and then along the way during the soak less overwhelming than removing the dirt and debris all at once at the end. Also, a pair of kitchen tweezers would come in very handy. 

From my little experience working with peach gum, I could confidently surmise that what one pays for a peach gum dessert outside largely covers the labor cost of picking out the dirt (and rent, and then some). With just a little effort, you too can be making this nutritious dessert at next to nothing in cost. The recipe is so easy and the result so worthwhile you'd soon be making more, I promise. What would one not do for beauty?

( I must admit, I am in love with this photoshoot... I purposefully dug out from storage my late mom's collection of vintage Chinese chinaware. They will probably start appearing in more photoshoot in the near future! )

What you'll need...
1 scant tablespoon (approx. 12 g)  peach gum
8 Chinese red dates
8 dried longan
10 dried lotus seeds
1 scant tablespoon goji berries
40 g rock sugar (or to taste)
800 ml water

Directions...
1. Soak peach gum in water overnight or a minimum of 6 hours. Discard water, rinse and remove any impurities.

2. Remove any sprout found in the lotus seeds. Using kitchen shears, remove the pit from the red dates. Soak lotus seeds, red dates, and dried longan in water to soften. Give the goji berries a quick rinse and set aside.

Peach gum expands up to 20 times in size, so a little goes a long way! Don't go overboard or you will regret when cleaning the peach gum...!
3. Place lotus seeds, red dates, and longan in a saucepan with 800 ml water and bring to a boil. Lower heat to a rolling simmer and let simmer for 25 minutes, covered. Add peach gum, goji berries, and rock sugar and let simmer for another 15 minutes. Serve dessert hot or chilled. Enjoy!


【 紅棗桂圓雪蓮子桃膠糖水 】
誰說滋潤糖水只限秋冬飲用!養顏健康可謂長年累月的功夫啊~ 近年桃膠大受熱捧,口感爽滑煙韌QQ,具高纖、高植物性蛋白質的優點,而且價錢大眾化,在水裡浸發過後只需少少心機清潔好,你都能夠輕易造出甜美滋潤美顏糖水啊~ 忠告:不要貪心浸過多桃膠啊,要不然會後悔... 

不得不承認,我個人很喜歡滿意這一輯相啊~ 為了這輯相,特意尋找媽媽以前珍藏下來的一套碗碟... 重見天日後,希望多點同大家見面!

材料:
桃膠           12 克(約 1 小湯匙)
紅棗           8 粒
桂圓           8 粒
蓮子           10 粒
杞子           約 1 湯匙
冰糖           40 克(視乎個人口味)
清水           800 毫升

做法:
1. 桃膠用大量清水浸發 6 小時或過夜。去除雜質、沖洗乾淨後瀝乾桃膠備用。
2. 蓮子去芯、紅棗去核,連同桂圓用清水浸軟。杞子略沖水備用。
3. 將蓮子、紅棗、桂圓和 800 毫升清水倒入煲內,待水滾後轉中慢火煮 25 分鐘。
4. 加入桃膠、杞子和冰糖,慢火煮 15 分鐘後即成,冷熱佳宜!

備註: 浸發好的桃膠體積可增達 20 倍,所以少量已足夠!

[Follow me on Instagram @alvinckl and @alvin.penthousekitchen and check out my Facebook Fan Page!]

Sunday, December 23, 2018

Spiced Red Wine Poached Pears | 紅酒燉洋梨

附中文食譜
It's that time of the year again! As the holiday season nears and as temperatures drop, I find myself instinctively craving the scent of warm spices, the comfort of a mug of boozy hot gluhwëin, and some good old Mariah multi-octave jingle. (I like to believe that I am not the only one who has this peculiarly seasonal, recurring hankering. Listening now as I write.)

Add flair and romance to any dinner, be it a special holiday or a regular weeknight!
When it comes to an all-time favorite dessert especially fitting for this time of the year, it's none other than red wine poached pears - a classic French preparation that is not only as elegant as it is delicious, but also reigns as one of the easiest desserts to make. If you are one that has opened bottles of red wine lying around the house, perfect. If you are not, just pop one open (a cheap one will do) and into the saucepan you add some spices and pears - et voilà, in as little as 30 minutes you have a show-stopper of a dessert.

Poached pears can be served warm or chilled and made in advance; and with virtually no room for failure it makes for a terrific dessert choice for your special holiday dinner or any regular weeknight in need of some holiday cheer or a classy, romantic touch. This recipe calls for pears and the mainstays of cold-weather spices: cinnamon, cloves, and star anise, but feel free to experiment with apples, cardamon and even peppercorns. Substitute some of the wine with fresh-squeezed orange juice and try adding some peel for a more citrus-y note. No matter your concoction, the simmering dessert will infuse your kitchen with a heart-warming scent of mulled wine that transports you to the most enchanting, fairy-tale like Christmas markets across Europe.

Dessert can't get any easier than this! Besides, you are sure to have a (almost) guilt-free crowd pleaser. After all, it's just fruit and alcohol, isn't it?
_________________________________________________________________________

What you'll need...
4 firm ripe Bosc or Conference pears
3 cups red wine
1/2 cup sugar
1 cinnamon stick
2 cloves
2 star anise
1 teaspoon vanilla extract (optional)

Directions...
1. Cut a thin slice off the bottom of the pears so they can stand upright. Peel the pears, leaving the stem intact.

2. Combine wine, sugar, spices and vanilla extract in a medium saucepan. Stir over medium heat until the sugar dissolves and the mixture begins to simmer. Add the pears, reduce heat and simmer, covered, for 25-30 minutes or until the pears are cooked but still firm, turning the pears every 5-10 minutes to ensure even color.

3. If preparing in advance, refrigerate in poaching liquid for up to two days. When ready to serve, remove the pears and spices and boil the poaching liquid until at least reduced by half or, if desired, reduced into a syrup for drizzling. Serve with mascarpone, whipped cream, or vanilla ice-cream. Bon appétit!


【 紅酒燉洋梨 】
材料:
啤梨                         4 個
紅酒                         700 毫升
砂糖                         100 克
肉桂枝                    1 枝
丁香                        2 粒
八角                        2 粒
純雲呢拿香油      1 茶匙(可免)

做法:
1. 啤梨去皮,切勿切走啤梨蒂啊!用刀於啤梨底部輕輕切平,以確保上碟時能夠直立。
2. 紅酒注入不鏽鋼鍋中,加入肉桂枝、八角、丁香和砂糖,用中火煮至糖溶解。
3. 加入啤梨,轉慢火煮約 25-30 分鐘至軟身,期間每 5-10 分鐘翻動啤梨一次讓其均勻上色。將啤梨取出晾涼。
4. 隔掉香料,用大火將燉紅酒煮至輕微濃稠成紅酒汁。享用啤梨時可拌些紅酒汁,亦可加入忌廉、香草雪糕。

備註:煮好的啤梨可即食,或連同燉紅酒一起存放雪櫃兩天。

[Follow me on Instagram @alvinckl and @alvin.penthousekitchen and check out my Facebook Fan Page!]