Showing posts with label Street food. Show all posts

Thursday, April 2, 2020

Steamed White Sugar Sponge Cake | 傳統白糖糕

附中文食譜
The classic Chinese steamed white sugar sponge cake is a childhood favorite for many, and it is no exception for me growing up in 1990's Hong Kong. The sheer thought of this humble street snack brings back many sweet memories - of my mother always buying me a couple of slices every time she visited the wet market; and me always looking at her with puppy eyes whenever we passed by a shop selling the familiar triangular slices. It is a symbol of joy in its simplest form.

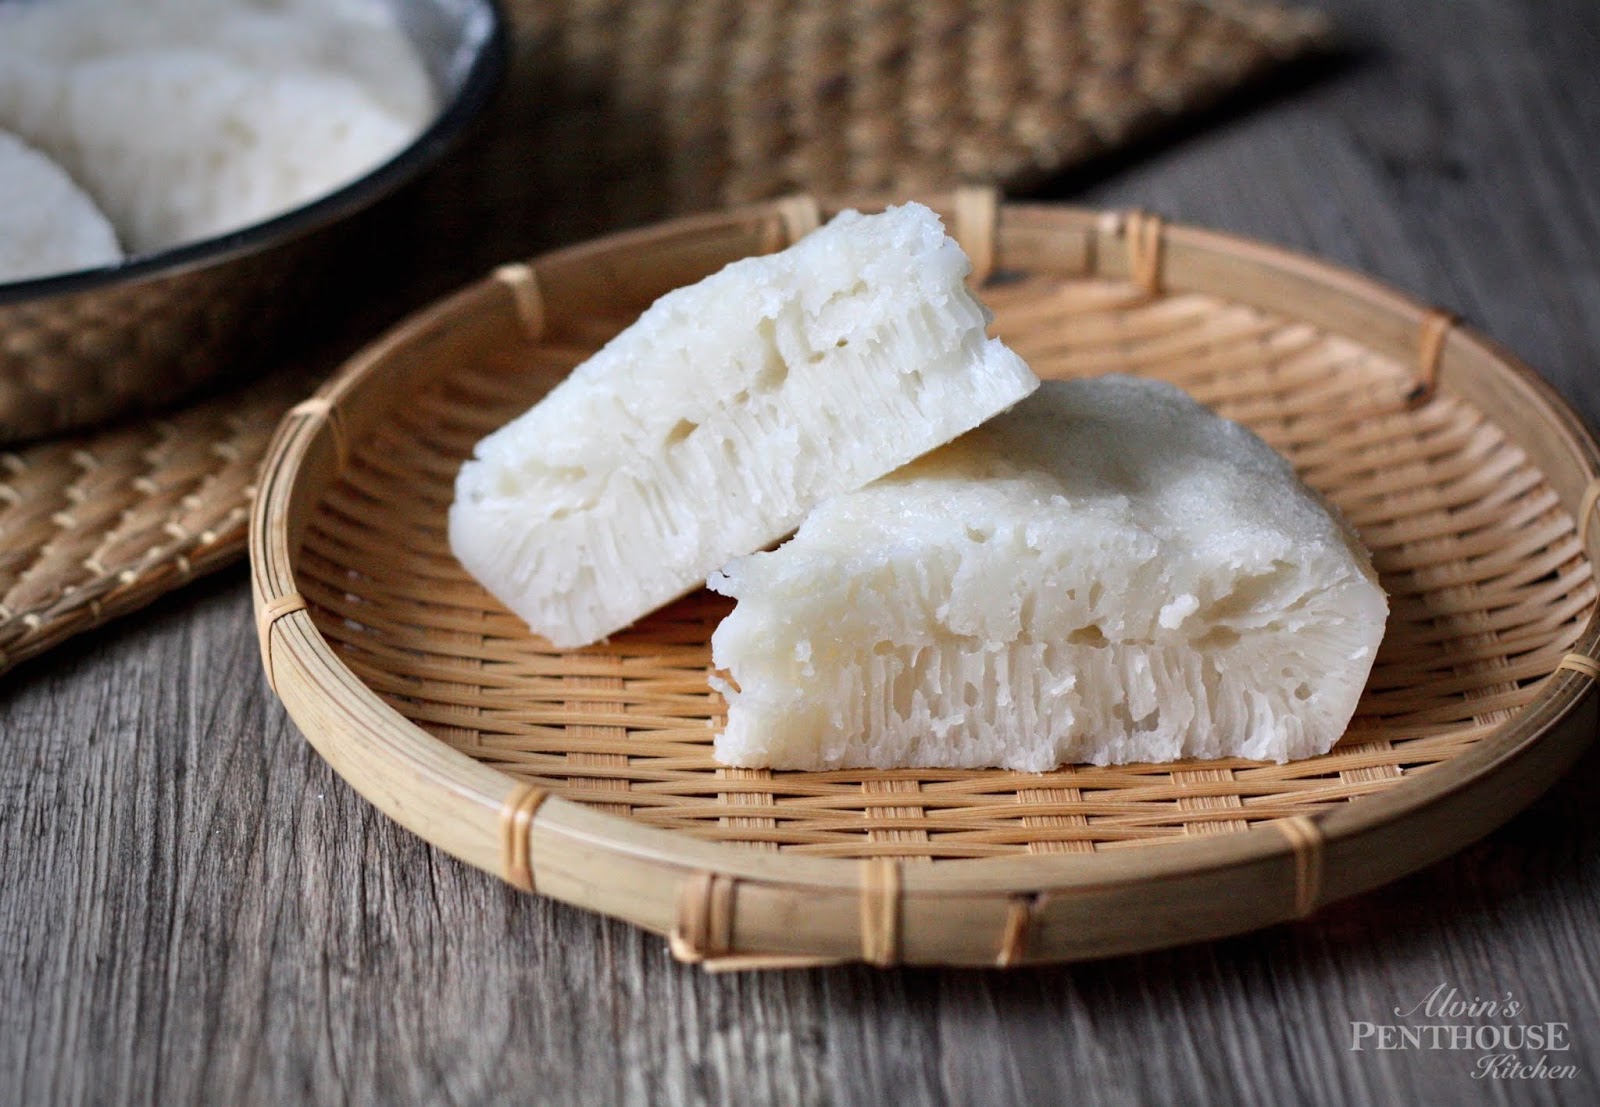
The steamed white sugar sponge cake (白糖糕, bak tong gou) is light and fluffy, glossy and slightly sticky to the touch, and moist and springy on the inside. It is sweet - but not tooth-achingly sweet, with a faint floral aroma that reminds of sweet rice wine and fermented glutinous rice that I adore (even as a child) and later come to recognize as yeast. Tearing into the cake would reveal an intricate honeycomb-like columnar structure that I always, to this day, find absolutely fascinating.

I may have since then left home for the United States for school for a number of years and not had bak tong gou for ages, but my affinity for this childhood favorite never weakened. Even upon my return to Hong Kong, I always made a stop at this old hawker who sold all kinds of traditional homemade confections from a little cart on Wellington Street, Central. This old hawker would have long gone by now. And with this old gentleman being quite possibly the very last hawker vending traditional sweets under the government's non-transferable itinerant hawker license, bak tong gou and the like will now be only found at handfuls of traditional bakeries, congee shops, and occasional dim sum lunches across town. The fond memories that many of us share of this childhood favorite, however, never fades.

Making the steamed white sugar sponge cake at home is really rather simple. With such a simple and inexpensive ingredient list, making this cake yourself and revisiting the memory lane might in fact be easier than finding this cake on the streets these days. As the name suggests, bak tong gou calls for granulated white sugar, giving the cake that pure white appearance that becomes slightly off-white only with the addition of yeast. Using brown sugar would create a sister version of the sponge cake, (黃糖糕) wong tong gou, or as Hong Kongers call it - steamed yellow sugar sponge cake. And like many traditional Chinese cakes, the sponge cake is steamed rather than baked.

The yeast gives the steamed sponge cake a distinct, honeycomb-like columnar texture and appearance
I have tried different methods and measurements for making the bak tong gou, and the one I share here by far trumps all others when it comes to effort and ease. Conventional approach will suggest cooking the rice flour mixture together with the sugar syrup over low heat on the stove top, which would require rigorous stirring and a greater attention span to prevent lumps from forming. I have also tried the double-boiler method which, while providing less direct heat, likewise requires continuous stirring. Instead, to make life and an already easy recipe a whole lot easier (who doesn't like the sound of that?), simply dissolve the sugar and yeast in warm water and add them to the rice flour mixture and give that a good stir, and the mixture is ready to rest.

Bak tong gou should taste sweet but not sour, which is a sign of over fermentation
By doing this, not only will you save loads of time from having to wait impatiently for the mixture to cool down before adding the yeast (lest you kill the yeast), you also spare a whole lot of elbow grease and the risk of ending up with undesirable lumps in the batter. Boom, an easy recipe just made even easier.

After putting together the batter, it is to be simply left covered for hours to allow the yeast to do its thing. The exact amount of time varies with ambient temperature, ranging anywhere from three hours in summer up to seven in colder months. Following the below technique will significantly cut the idle time, regardless the season.

I have long been known to detest precise measurements in the kitchen, relying almost too wholeheartedly on "the senses" and cups and tablespoons and only reluctantly pulling my kitchen scale out when converting recipes into metric units when called for. Most recipes online for the steamed sponge cake come in metric unit. Fortunately, the steamed sponge cake is very forgiving to minor mathematical errors. Out of convenience, here I provide both measurements in cups as well as grams or millimeters. From here on out, with this recipe finally consolidated and added to my collection, I am rejoicing that my kitchen scale can rest in peace inside the cabinet whenever I make bak tong gou. Perhaps I would be making this cake and walking down the memory lane more often from now on!

Ingredients...
1 cup warm water, divided
1 cup water
2 cups (280 g) rice flour
3/4 cup (150 g) white sugar, divided
2 teaspoons active dry yeast
1/4 teaspoon vegetable oil

Proofing the yeast & making the batter
1. Transfer 1/4 cup of the warm water into a cup or bowl. The water should be around or just slightly higher than body temperature (roughly 100°F/38°C) and not hot to the touch. Tip in the active dry yeast along with 1/2 teaspoon of the sugar, stir well and let rest for 10 minutes or until foamy.

2. In a large mixing bowl, combine the rice flour and 1 cup of water (room temperature). Stir until thick and smooth.

3. Add sugar to the remaining 3/4 cup of warm water and mix well until sugar dissolves. Check that the syrup is close to body temperature and not hot to the touch.

4. Add the yeast mixture and syrup to the flour mixture and stir well to combine. Cover with cling wrap and place inside a microwave or oven along with two cups of boiling water to generate heat. Close the door and let the batter rest for 2 hours or until large bubbles form on the surface of the batter. Refresh the boiling water to speed up the process if needed.


Steaming the cake
1. Grease a 9-inch round cake pan generously with oil. Once the batter is ready, remove from the oven, stir well, and transfer batter to a large measuring cup. Add vegetable oil and stir to combine.

2. For a smoother cake surface, pour batter over a strainer into the cake pan and discard the foam. Steam over high heat, covered with the lid wrapped with a tea towel, for 25 minutes.

3. Turn the heat off and allow the cake to rest in the steamer for 10 minutes with the lid off. Remove cake from the steamer and let cool for another 10 minutes on the counter. Slice and enjoy fresh at its best!

Note: Cover and store at room temperature for up to 24 hours. After that, refrigerate for up to 4 days. To reheat, steam gently.

Is Bak Tong Gou also your childhood favorite?
Share with me or leave a comment below! Tag #alvinspenthousekitchen.
Find me on Instagram @alvinckl and @alvin.penthousekitchen and follow my Facebook Fan Page!

【 傳統白糖糕 】

細對白糖糕就有著一種情意結。想當年媽媽知道我最愛白糖糕,每次落街市都會買來給我吃;人大了,白糖糕依然充滿著童年回憶。別看白糖糕外表平凡,一件好的白糖糕雪白晶瑩、味道清甜芳香而不酸、入口爽滑而稍韌,難怪令人難以抗拒。自家製白糖糕十分簡單,經過屢次改良,終於研製出以下最簡易、最省時、零失敗的食譜跟大家分享、一起懷緬童年!

材料:
溫水*                      240 毫升
清水                        240 毫升
粘米粉                    280 克
砂糖                        150 克
即溶酵母                2 茶匙
菜油                        1/4 茶匙

做法:
1. 先用 60 毫升溫水來開即溶酵母,加入半茶匙砂糖,拌勻備用約 10 分鐘。
2. 粘米粉及清水拌勻至輕微黏稠狀,備用。
3. 剩餘砂糖與溫水攪勻至完全溶解。
4. 將發好起泡的酵母和糖水加入粘米粉漿內拌勻。
5. 蓋上保鮮紙,連同 2 杯滾水放置在微波爐或焗爐裡面發酵 2 小時,直至粉漿出現大氣泡。滾水會製造蒸氣熱力,有助粉漿在受控的環境下迅速發酵。
6. 發酵好的粉漿加入菜油拌勻,隔篩(隔除過量氣泡,白糖糕表面會更加光滑)倒入已掃油的圓形不鏽鋼碟內,用大火蒸約25分鐘。
7.  熄火開蓋,待涼約 10 分鐘後把白糖糕取出再晾涼約 10 分鐘後切件即成!

備註:
1. *注意暖水溫度應接近或輕微高於體溫,不應燙手,不然會「殺死」酵母。
2. 家中如有蒸籠,可以用蒸籠去蒸,不然可以用毛巾包著煲蓋隔水蒸,有助防止倒汗水滴在糕面,影響製成品。
3. 正宗白糖糕其實不該帶有酸味,而酸味可能來自發酵過度。

Is Bak Tong Gou also your childhood favorite?
Share with me or leave a comment below! Tag #alvinspenthousekitchen.
Find me on Instagram @alvinckl and @alvin.penthousekitchen and follow my Facebook Fan Page!

Monday, September 2, 2019

Kor Moo Yang: Thai Grilled Pork Neck | 泰式燒豬頸肉

附中文食譜
My memories of Bangkok often conjure up images of lively, cacophonous markets; of thoroughfares routinely jammed with brightly colored cabs; of fearless motorbike taxis zipping dexterously through the traffic; and of course, images of the myriad street food the city is known for. Char-grilled pork skewers, Isaan sausages, fried chicken, soup noodles of all sorts, banana and egg roti are surely no strange sight to street food aficionados and starving food seekers in Bangkok.

Happy street food crawl in Happy Land Market, Bangkok
Turn this humble and inexpensive cut of pork into a delectable household favorite!
Fringing Happyland Center, a bustling food market frequented by only locals in the Bangkapi district, there is a street lined with fruit vendors, Thai bubble tea makers, a sweets and desserts stall, and countless other street food vendors that spill onto adjacent alleys. In one corner, a faded and slightly worn green metal open pit oven stands, spewing smoke into the already hot and muggy streets. Inside the oven are slabs of marinated pork neck, pork jowl, and juicy chicken legs grilling and glistening over hot charcoal, the meats occasionally turned and flipped and altogether replaced once cooked and ready for sale. There I always stand, about a meter away from the side, taking the sight and smells in, drooling while sweat profusely drips from my temples down my chin. I have been to this market more times than my fingers can count, in search for the most genuine street foods served to locals and priced for locals, but still this green oven captivates me every single time. 

Kor Moo Yang (คอหมูย่าง), or grilled pork neck, is to no surprise a Thai favorite found everywhere from food centers to streets and restaurants. In Hong Kong, this dish is served in just about every Thai restaurant, making up one of the few standard starters that every Hong Konger knows when going out for Thai food.

Pork neck is probably one of my favorite cuts of meat, layered with just the right balance of lean meat, fat, and muscle, giving a crunchy chew that is oh so flavorful even with the simplest marinade. Besides, pork neck is also much more forgiving than the leaner cuts so the chances of overcooking is rare.

Of all the street foods out there in Bangkok, Kor Moo Yang is one that is easy to replicate at home, even without a charcoal grill. Simply prepare the marinade and marinate the pork overnight, then pop the slabs into a hot oven and you will soon be swooning over the heavenly aroma of a Thai barbecue. The addition of palm sugar in the marinade not only adds depth and sweetness, but also increases the caramelization on the surface of the meat (I'll be first to dive shamelessly for the charred, crispy bits). As with most marinades, the following is just a guideline. Feel free to toss in some finely chopped kaffir lime leaf or shallots for variation in flavor! For those of us lucky enough to have a barbecue on a patio, this recipe is also perfect for a quick grill.  Try this marinade on chicken wings and pork chop!


Thinly slice pork neck at a 45° angle across the grain for best results
I swear this grilled pork neck is going to taste better than any you have tried in a restaurant. While the meat is already flavorful enough to enjoy on its own, the dish is not complete without a Nam Jim dipping sauce! Kor Moo Yang can go with just about any variation of Nam Jim. Click below for my recipe.

Nam Jim: Thai Dipping Sauce

What you'll need...
500 g pork neck
2-3 stalks lemongrass, white parts only, finely chopped
2 cloves garlic, finely chopped
2 cilantro roots or 4 cilantro stems, chopped
2 teaspoons palm sugar
1 tablespoon oyster sauce
1 tablespoon fish sauce
Nam Jim

Directions...
1. Trim excess fat off the pork neck.


2. In a mortar and pestle or food processor, pound lemongrass, garlic, and cilantro roots or stems into a paste. Add palm sugar and pound until dissolved. Add oyster sauce and fish sauce and stir to combine. Pour marinade over the pork neck and coat well, refrigerate for at least two hours or overnight for best results.


3. Remove pork neck from the refrigerator about 20 minutes prior to cooking. Preheat oven to 200C/400F. Line a baking tray with baking paper and grill pork neck for 15 minutes. Flip and continue grilling for 10 minutes or until slightly charred on the outside. Cooking time will vary depending on the thickness of the pork neck.

4. Allow pork neck to rest for 5 minutes. To serve, slice the pork neck thinly across the grain, angling the knife at 45 degrees if the pork neck is particularly thin. Serve warm with Nam Jim. Enjoy!

Tried this recipe?
Share with me or leave a comment! #alvinspenthousekitchen 
Find me on Instagram @alvinckl and @alvin.penthousekitchen and follow my Facebook Fan Page!

【 泰式燒豬頸肉 】

老老實實,有邊次去泰國餐廳唔點燒豬頸肉先? 爽口彈牙、香口又惹味,只需預先醃好和焗爐一部,在家都能夠造出曼谷街頭、炭香四溢的正宗泰式燒豬頸肉!再配上自家製泰式酸辣蘸汁,風味絕佳。 這好可能是您食過最好吃的燒豬頸。

材料:
豬頸肉                      500 克
香茅                           2-3 根
蒜頭                           2 瓣
芫荽根部                  2 根(或以適量芫荽莖代替)
棕櫚                      2 茶匙
蠔油                           1 湯匙
魚露                           1 湯匙
泰式秘制酸辣蘸汁 

做法:
1. 把豬頸肉洗淨,將過多的脂肪除去備用。
2. 把香茅白色部份切成小圓圈後剁碎。將蒜瓣和芫荽根或莖剁碎。
3. 用研缽和研棒或攪拌機把香茅、蒜末、芫荽磨成蓉。
4. 加入椰糖,繼續磨至完全溶化。加入蠔油和魚露,拌勻。
5. 豬頸肉加入醃料,放進雪櫃醃 2 小時或過夜則最為理想。
6. 烤肉前先將醃好的豬頸肉拿出來解冷約 20 分鐘。預熱焗爐至 200C/400F。
7. 豬頸肉放在鋪了烘培紙的烤盤上,焗 15 分鐘後把肉翻轉,視乎豬頸肉厚度,再烤約 10 分鐘至肉邊微焦即可取出。
8. 待豬頸肉稍涼,以 45 度角逆紋切成薄片,以蘸汁伴吃,味道絕佳!

Tried this recipe?
Share with me or leave a comment! #alvinspenthousekitchen 
Find me on Instagram @alvinckl and @alvin.penthousekitchen and follow my Facebook Fan Page!     


Wednesday, June 27, 2018

Sriracha Crispy Tofu with Taiwanese Pickled Cabbage | 醬香脆皮豆腐配台式高麗泡菜

附中文食譜
Nearly half a year since my last visit to Taiwan, I feel a sudden pang of craving for the island's renowned street food. Topping the long list of must-haves when food-crawling through Taipei's legendary night markets is the "stinky tofu" - deep-fried, fermented bean curd whose mouthwatering, funky stench seduces even from streets away. In my opinion, the stinkier the tofu the better - in which case Hong Kong's own version may sometimes prevail - yet, its scarcity and inflated prices these days make them more of a distant memory.

A major difference between the two is the additional accompaniment of pickled cabbage typically served alongside stinky tofu in Taiwan. Sweet and mildly sharp with notes of garlic and chili, the pickled vegetables give a refreshing crunch that not only balances out the lip-burning sensation of tofu fresh off the fryer and the heat of chili sauce, but also relieves the greasiness (and guilt). The pairing is so perfect I sometimes wonder if one can equally enjoy stinky tofu without pickled cabbage. Ditto that with any deep fried foods, for that matter.


Drawing inspiration from the popular Taiwanese street snack, the following recipe is a simple take on crispy tofu shallow-fried and then dressed in a sticky sweet and spicy Sriracha sauce and served with crunchy pickled cabbage. Both firm and extra-firm tofu would suit the dish brilliantly, although the former may lend even more of a silky texture underneath the crispy, golden shell. For the best results, it is essential to press and drain the tofu to extract as much liquid as possible. It may sound tedious, but I promise it is easy and will worth every effort.

Warning: this is a jar of vegetables you will NOT want to put down!
The crunchy Taiwanese pickled cabbage - perhaps as important as the tofu itself - can be made ahead of time and stored in the refrigerator for up to weeks. With so few ingredients, it is so simple and so addictive it can stand on its own as a snack throughout the day or even make a great aperitif. My first batch was gone within just a couple of days!

What you'll need...
Taiwanese Pickled Cabbage
1 small head cabbage
1 tablespoon coarse salt
1 cup rice vinegar*
3/4 cup white sugar
1/4 teaspoon salt
4 cloves garlic, minced
1 bird's eye chili, thinly sliced
1 small carrot, shredded or thinly sliced

Note: Alternatively, use white distilled vinegar or apple cider vinegar, or a combination of both.

Sriracha Glaze
2 tablespoon water
3 tablespoon Sriracha (or to taste)
3 cloves garlic, minced
1 tablespoon yellow bean sauce or miso paste
1 tablespoon white sugar
1 teaspoon soy sauce

Crispy Tofu
1 block (450 g) firm or extra-firm tofu
1/3 cup cornstarch
Pinch of white pepper and salt
2 tablespoon oil for shallow frying

Taiwanese Pickled Cabbage
1. Remove and discard the outer layers of the cabbage. Working your way down to the core, peel and roughly tear each layer of leaves into bite-sized pieces. Place in large bowl or zip lock bag and sprinkle evenly with coarse salt and give the contents a good toss. Set aside for one hour, giving it a stir or shake every 20 minutes or so.


2. In a saucepan, combine vinegar, sugar, and salt on medium heat and stir until sugar dissolves. Turn heat off. Tip in shredded carrots, chili, and minced garlic and set aside to cool.


3. Drain the cabbage and rinse in running water to remove salt. Press leaves gently and drain as much water as possible. Place leaves into a large pickling jar, pour in vinegar mixture and ensure that the cabbage is completely submerged. Otherwise, top up with more vinegar. Store in refrigerator and the pickled cabbage will be ready in as soon as just half a day!
Sriracha Glaze
In a small saucepan, combine all ingredients and bring to a simmer, stirring until sugar dissolves. Taste and adjust seasoning.

Crispy Tofu
1. Press and drain: on a plate, sandwich tofu block in between layers of paper towels and top with another plate. Weigh it down with heavy cans or books for at least 30 minutes. Drain and pat dry. Cut into chunky cubes.


2.  In a medium bowl, whisk together cornstarch, white pepper and salt. Add tofu cubes and toss well to coat, shaking off any excess. Heat oil in pan and fry the tofu cubes until all sides are golden and crispy, about 4 mins each side. Drain tofu on paper towels.


3. On a plate, spoon Sriracha glaze over crispy tofu and top with a heap of pickled cabbage. Enjoy hot! 
 
《醬香脆皮豆腐配台式高麗泡菜》

世界杯深宵夜市小食!每次遠赴台灣夜市,總是鍾情香氣撲鼻、熱辣辣的臭豆腐,拌上香辣醬和清甜爽脆的高麗泡菜,實在味力無法擋!來不及飛台灣,不如自家製 — 不「臭臭」的脆皮豆腐同簡易台式泡菜!

台式高麗泡菜
椰菜                    1 小顆(約 600 克)
粗鹽                    1 湯匙
糯米醋               250 毫升(可用白醋或蘋果醋)
砂糖                    170 克
                       1/4 茶匙
蒜瓣                    4 瓣(剁碎)
指天椒                1 隻(切片)
甘筍                    1 小條(刨絲或切薄片)

1. 椰菜除去外層較髒的葉子,內層的葉子撕成片狀,均勻撒上粗鹽,靜置 10 分鐘後用手拌勻,其後每 15-20 分鐘輕輕翻動一次,待葉子出水及微軟後即可。椰菜最多鹽醃一小時,以保其爽脆和避免過鹹。
2. 靜置椰菜同時,把醋和砂糖煮滾,待砂糖溶化後熄火。加入甘筍絲、蒜末和辣椒放涼備用。
3. 鹽醃過的椰菜用涼開水沖洗一遍,瀝乾水分。放入玻璃容器中,再倒入糖醋,蓋上蓋子,放入冰箱半天以上既可食用。

備註:注意糖醋必須淹過椰菜,不足必須再添加。
取用泡菜一定要用乾淨不含油污及不含水的器具,否則容易變壞。

是拉差甜辣醬
開水                      2 湯匙
是拉差辣椒醬    3 湯匙(份量隨個人辣度喜好)
蒜瓣                      3 瓣(剁碎)
豆醬味噌         1 湯匙
砂糖                     1 湯匙
生抽                     1 茶匙

1. 把所有醬汁材料拌勻煮溶,再作適當調味。   

脆皮豆腐
硬豆腐                 1 磚(約 450 克)
生粉                     40 克
白胡椒       適量
煮食油                2 湯匙

1. 豆腐先加壓出水:豆腐用吸水紙包著放在碟中,上方再蓋上盤子,以重物(如罐頭)加壓 30 分鐘或以上,內部水分便會流出。出水後用吸水紙抹乾豆腐,並切成大小一致的小塊。
2. 生粉、白胡椒和鹽拌勻。豆腐粒沾粉後下鍋煎炸至金黃色,每邊約四分鐘。盛起後用吸水紙吸取多餘油分。
3. 脆皮豆腐上淋上是拉差甜辣醬,再配上一堆爽甜高麗泡菜,即成!

[Follow me on Instagram @alvinckl and @alvin.penthousekitchen and check out my Facebook Fan Page!]

Monday, May 4, 2015

Eating, Exploring on Wheels | Amsterdam


Stumbling upon De Riekermolen by accident on bike
Strolling through Albert Cuypmarkt, Amsterdam's century-old street market back in late March, one cannot help but feel a sense of renewal as winter gently gives way to spring. Seasonal produce of all colors of the spectrum abound, competing with stall after stall of budding tulips and vibrant blossoms. At roughly 4pm on a Thursday afternoon, under the glowing early-spring sun, chic, modishly dressed locals are already crowding the scores of bars and bistros lining the streets, creating a vibe that is both convivial and remarkably lively. After combing through every fishmonger, Dutch cheese and spice trader, I appeased my fervent craving for broodje haring then picked up some fresh produce for my kitchen back home.

(Clockwise from top right) The historical, lively Albert Cuymarkt street market bustling with locals and hungry visitors, chefs and homecooks; the famous I AMSTERDAM logo on Museumplein; pretty faces of the flower capital of the world!
A city best explored on bike or on foot, Amsterdam is undoubtedly one of my favorite cities in the world. My favorite thing to do? Hopping on a bike, ride along the locals, and head towards the concentric circle that is the city center, exploring one fascinating layer after another just like peeling an onion. Whether day or night, the numerous canals running through the city exude magic - especially when dusk falls, and when the lights light up the rolling banks and charming bridges. When in need for an escape, I'd head south or west, leisurely riding through peaceful parks and along rivers, occasionally stopping to take in views of olden windmills and fields of tulips and daffodils so iconic of Netherlands.

Not only does Amsterdam host some of the most genteel and friendliest locals, it also boasts amazing eats that foodies will go head over heels for. Among the many food finds I have compiled a short list of must haves on my every visit to Amsterdam.

(From left) Broodje haring - freshly deboned raw herring with onions and pickle in a sandwich; Dutch pancake - nuf' said; Dutch apple pie - flaky crust piled high with thinly sliced apples and topped with streusel!


Oh, did I not mention there is that Amsterdam Heineken Experience?

My favorite dessert spots...

De Laatste Kruimel, Langebrugsteeg 4: a cute and welcoming pastry and coffee shop, serving up all kinds of homemade pies and quiches, overlooking a canal
Pannenkoekenhuis "Upstairs", Grimburgwal 2: a quirky, cozy, dainty little pancake house upstairs of possibly the world's steepest steps, serving up traditional pancakes

My favorite street markets...

Noordermarkt, Joordan
Albert Cuymarkt, De Pijp

[Write to me under comments! Check out my Facebook Fan Page and follow me on Instagram @alvinckl]

Saturday, January 10, 2015

Happy 2015! | Taipei

Dear home cooks,
Kicking off my cross-year trip to Taipei with the sights and sounds and scents of Raohe Night Market (饒河觀光夜市)

New Years Eve Countdown at Taipei 101
Alvin's Penthouse Kitchen wishes you a fruitful, delicious, Happy 2015!! As 2014 drew to a close, the Penthouse Kitchen took a little break and headed for Taipei for the New Years. As with all visits to Taiwan's bustling capital, the first and foremost stop on the itinerary is none but the city's many famed night markets. There, one navigates through narrow channels lined with food hawkers, each showcasing a specialty of some sort that ranges from ubiquitous local classics to the original and the creative.

As one grapples with the sights and sounds of a true steet food paradise, you are bound to fall first for the tantalizing aromas of sticky, grilled wild boar sausages(山豬肉香腸)infusing the atmosphere. And just as you find yourself overwhelmed by choice, the faintly puckering, pungent waft of deep-fried stinky tofu(臭豆腐)- served accompanied by pickled cabbage and a garlicky chili sauce - will surely assault your nostrils and have you drooling for more. Love it or hate it, there's just no ignoring it.

A stinky, tasty national obsession: stinky tofu served three ways. Love it or hate it, there's just no igrnoring it.
(From left) Stuffed pepper pork buns; soya sauce innards galore; aiyu jelly and lemon
"QQ"- as the Taiwanese affectionally describes all things chewy: freshly made and cut taro balls(芋圓)at Jiufen

Meaty, crusty, sesame-dusted stuffed pepper pork buns(胡椒餅)made fresh daily and baked in hot canisters; spicy, crunchy, tender pounded deep-fried chicken steaks(炸雞排)larger than your face; flaky, crispy, multi-layered scallion pancakes(蔥抓餅)made to order are all but only a few of my favorites that are not to be missed at Taipei's lively night markets. Whether you are there for a late night snack or a street feast, you are in for a real visual and taste treat. Not to mention the plethora of traditional desserts and beverages... that's if you still have room for that. But if you are like me, all things sweet belong to that other stomach, right?

As I write, I am back to work from welcoming the New Year in Taiwan (still detoxing and cleansing from excessive alcohol and grease) and currently busy preparing for a significant career milestone - so please stay tuned in the next couple of weeks as I shortly resume making a mess at the Penthouse Kitchen... bringing you more exciting, easy, tasty homecooking recipes this fresh, new year!

[Any thoughts or comments? I want to hear from you! Also check out my Facebook Fan Page]