Tuesday, June 25, 2019

Sweet Potato and Bacon Waffles | 蕃薯煙肉窩夫

附中文食譜
Growing up, waffles were hardly part of my breakfast repertoire. We didn't grow up with a waffle maker at home. Although Hong Kong-style waffles were sold everywhere at hawker stands - generously slathered with peanut butter and condensed milk and sold side by side with egg puffs - I never really developed strong memories of waffles since street food was strictly off limits in my family.

Much in the same way as American style pancakes, waffles always felt to me like empty calories heavy with flour and laden with sugar - nothing more than a vehicle for the river of syrup or pat of butter, or the occasional bells and whistles.

Things started evolving for me when fried chicken and waffles became a thing in the U.S., something of a national obsession really. Don't get me wrong - chicken and waffles have been around for ages, with origins purportedly rooted in the South, but the formidable duo has seen a revival of late as brunch grew to become the top trend in American cuisine and beyond. In an instance, the humble waffle has been propelled to the center stage and under the global spotlight as an increasing number of restaurants worldwide are adding the combo to their menu and coming up with their own signature variations, be it savory or sweet. Waffles were no longer just for breakfast; neither are they simply just plain or sweet. My attitude towards waffles shifted. Next thing I know, I developed a craving for fried chicken and waffle and make a beeline for my favorite spot every time I land in New York.

End of last year, I picked up a multi-function sandwich maker at an appliances blowout sale that came with a waffle griddle. The machine hasn't seen daylight since until this past weekend when I decided a lazy "brunch for dinner" was in order for my little get-together with a couple of good friends. And by lazy, I mean it was just going to be waffle and gazpacho, no cooking required. I wanted the waffle to be the main event, something that was at once comforting, healthy, and satisfying. I also did not want flour to be the bulk of the waffle. So I looked to sweet potato - and sure enough - sweet potato waffles is a thing.

"Brunch for Dinner": a cozy, happy, celebratory weekend reunion!
Sweet potatoes are considered low on the glycemic index scale - meaning the carbohydrates are slowly digested, absorbed, and metabolized and do not cause a spike in insulin levels. Not only are these wholesome sweet potato waffles low in carbs and calories (make them even better for you without the bacon - but hey, baaaaacon), they are naturally gluten-free. Most recipes on the internet call for coconut flour to be incorporated into the mixture, but considering that in some parts of the world coconut flour is not readily available or is plain costly, I recommend other nut flours or cornstarch as a gluten-free substitute.


In this savory version of sweet potato waffles, bacon, spring onions and a touch of garlic powder give incredible flavor, while paprika brings subtle heat that plays off the mild sweetness in the sweet potatoes. Top the waffles with more crisp bacon, a gorgeous, runny sunny-side-up and a generous sprinkle of chopped spring onion, and finish with a light drizzle of maple syrup and hot sauce for a delicious sensory experience. Pair the ensemble with a refreshing, appetizing cup of gazpacho (recipe to come soon!) and you have a complete brunch suited for any time of the day!

What you'll need... (for two)
1 medium sweet potato (2 cups grated)
1 bunch spring onion, chopped
3 tablespoons cornstarch*
1 teaspoon paprika
1/2 teaspoon garlic powder
Large pinch of sea salt
1 slice bacon (optional)
2 eggs, beaten

To serve:
Bacon | Fried or poached egg | Avocado | Maple syrup | Hot sauce | Chopped spring onion

Note*: substitute with 2 tablespoons of coconut flour

Directions...
1. Peel and grate the sweet potato. Give the shredded sweet potato a few quick pulses in a food processor if necessary to break down any long strands. Important: lay grated sweet potato out on paper towels. Place another paper towel on top and press down to absorb as much liquid as possible.


2. Preheat waffle maker or waffle iron.

3. In a small frying pan, cook the bacon (if using) until desired crispiness, drain excess fat and crumble the bacon. In a large bowl, mix together all the waffle ingredients including the crumbled bacon until thoroughly combined.


4. Once the waffle maker is hot, grease with bacon fat or spray with nonstick spray. Spread sweet potato batter evenly onto the waffle maker, making sure it's packed down lightly. Close machine and let cook until golden brown and slightly crispy, flipping once if necessary, about 8 - 10 minutes. Remove and repeat with remaining batter.

5. While waffle is cooking, prepare toppings of choice. If making waffles in batches, lay cooked waffles on a rack and keep warm in an oven. Transfer to a plate and top with desired fixings, enjoy!

 【 蕃薯煙肉窩夫 】

非一般的格仔餅啊!近年美國掀起炸雞窩夫熱潮、加上週末嘆 Brunch 的文化漸催普及化,窩夫不再只局限於早餐或作甜品~ 早餐當晚餐又何樂而不為呢? 用蕃薯製作的格仔餅鹹中帶甜,低卡高纖零麩質、不會令血糖飆升,配上培根煎蛋蘑菇和蕃茄凍湯,是完整完美的「早餐」啊!

材料(兩人份量):
蕃薯                                200 克
蔥                                    1 小札
粟粉*                             3 湯匙
紅椒粉 (paprika)          1 茶匙
蒜粉                                1/2 茶匙
海鹽                                1/4 茶匙
煙肉                                1 片(可免)
雞蛋                                2 隻

伴碟:煙肉 | 太陽蛋 | 水煮蛋 | 牛油果 | 楓糖漿 | 辣醬 | 蔥花
備註*:粟粉可用 2 湯匙椰子粉代替,更為理想

做法:
1. 蕃薯去皮刨絲,建議用食物處理器把蕃薯絲略為打碎。
2. 蕃薯絲鋪在廚房紙上再放上另一層廚房紙,用力按壓,把多餘水份吸乾。
3. 煙肉煎香,切成碎片 (如使用)。
4. 雞蛋打成蛋液、蔥切成蔥花,保留少許綠色部分作裝飾用。
5. 把所有窩夫材料拌勻備用。
6. 窩夫機預熱,掃上少許油,鋪上適量蕃薯蛋漿,蓋好烘至呈金黃色和帶脆,約 8 - 10 分鐘。伴上自己喜歡的配料,即成!

備註:如分批製作窩夫,建議將弄好的窩夫平放焗爐架上用微溫保暖。

[Follow me on Instagram @alvinckl and @alvin.penthousekitchen and check out my Facebook Fan Page!]

Monday, May 20, 2019

Turkish Eggs | 土耳其式水煮蛋

附中文食譜
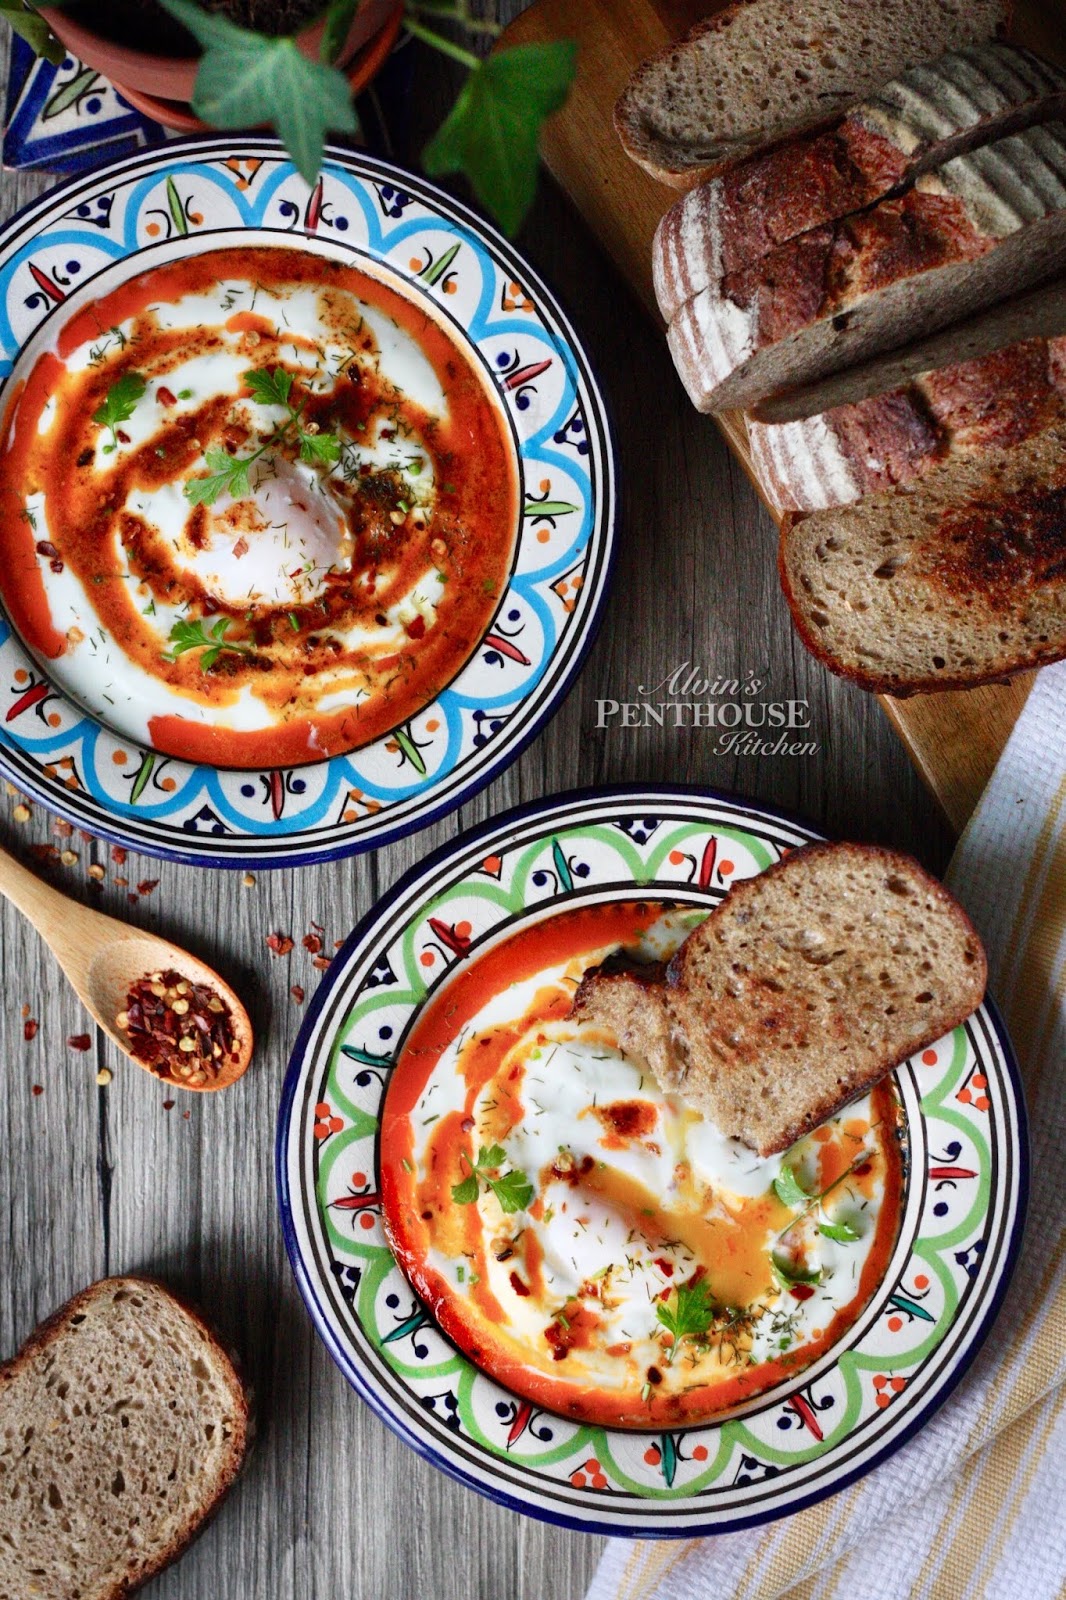
The first time I have ever tried Turkish eggs was, strangely, not in Turkey, but in Brisbane, Australia, at a cozy, two-storied cafe overlooking a sunny suburban street lined with boutiques and bakeries. To anyone who has never had Turkish eggs, or Çılbır, pronounced as "chulburr", the idea of laying a poached egg on Greek yogurt may raise an eyebrow or two. Add on top a drizzle of chili-infused melted butter, the concept seems to take "odd" farther up a notch. Creamy, tart, oozy, savory, then spicy, too? The idea of Turkish eggs appears to throw our notion of a familiar brunch into shambles.


But before you resort to the comfort zone with the likes of Eggs Benedict, I urge you to give this dish a try. Because with just one try it had got me hooked. The soft poached egg, with its silky egg whites, melds beautifully into a thick and creamy and slightly tart Greek yoghurt that is laced with garlic and sometimes dill. Butter is then melted and infused with chili then drizzled over the dish, imparting an extraordinary depth of flavor and giving a luxurious, aromatic kick. As you poke into the egg, luscious yolk oozes out like liquid gold, bringing the heavenly sensation to the next level. To scoop and soak up every last smear of yolk and yoghurt, thick, crusty, griddled sourdough or even warm naan would most certainly do the trick.

Word is that Çılbır originated as a breakfast staple in Eastern Turkey. I do not recall seeing this dish on menus around town in the iconic Istanbul (but then it was nearly a decade ago when I visited and I was mostly staying at budget guesthouses), but it is definitely making an increasing appearance at brunch restaurants around the world. A small breakfast cafe in West London easily charges this dish for £9, but you can just as easily prepare this dish at a fraction of the cost at home.

Aleppo (a mild Turkish red pepper flake) is traditionally used in making the chili-infused butter for this dish, but if unavailable, substitute paprika and a pinch of crushed red pepper flakes for no less a bang in flavor. While dill is not required on Turkish eggs, I personally find using some fresh or dried dill adds an uplifting herbaceous note and complexity to the dish.

After all, creamy, tart, oozy, savory, and spicy isn't just incredible; it is - in Nigella Lawson's words - "a revelation and a complete sensation."

What you'll need... (serves 2)
200 g Greek yoghurt
1/2 clove garlic
A few fronds of fresh dill, or a pinch of dried dill
2 tablespoons butter
1 tablespoon olive oil
1 teaspoon paprika
1 pinch crushed red pepper flakes
2 eggs
1 tablespoon white vinegar
Thick sourdough toast, to serve

Directions...
1. Using a fine grater, grate half a garlic clove and whisk into the Greek yoghurt with a small pinch of dried dill, if using. Set aside and allow the yoghurt to come to room temperature.

2. Gently melt butter in a small pan until it begins to turn into an aromatic, nutty brown. Stir in the olive oil, then add paprika and red pepper flakes and leave to infuse over a low heat. Turn heat off and set aside to cool.

3. Bring a pot of water to a simmer. Add the vinegar and make a swirl with a large spoon. Break cold egg into a small dish or saucer. Holding dish just above the simmering water, gently slip egg into the water. Poach for 3 mins until set, transfer egg with a slotted spoon to some kitchen paper to drain. Repeat with the other egg.

4. To serve, divide the yoghurt into two warm bowls, top each with a poached egg, then drizzle over the chili-infused butter. Season and scatter over some dill and crushed red pepper flakes and dig in with thick slices of crusty bread!

Note: I prefer grating the garlic here over finely chopped garlic as the flavor melds more readily into the yoghurt and it also reduces the chances of biting into pieces of raw garlic.

【 土耳其式水煮蛋 】


多年來眾人熟悉的 Eggs Benedict 一直被視為悠閒週末 brunch 之首選,是時候跳出框框了!話說有次在外國試過 Turkish eggs,嫩嫩的 poached egg 配上綿綿的香草乳酪再淋上香辣牛油,跟厚厚的吐司一起吃,味道配搭新奇刺激、口感一流,有別於傳統早餐菜式,可說是一見鍾情啊~ 急不及待回家研製、同大家分享食譜啊!

材料(二人份):
希臘乳酪                 200 克
蒜頭                         半瓣
刁草                         適量
牛油                         2 湯匙
橄欖油                     1 湯匙
紅椒粉 (paprika)    1 茶匙
乾辣椒碎                 適量
雞蛋                          2 隻
白醋                          1 湯匙
厚切酸種麵包        

做法:
1. 把蒜瓣磨成蓉。將乳酪、蒜蓉和少量刁草拌勻備用,待其回到室溫。
2. 牛油用慢火煮溶,期間會起泡。煮至牛油開始呈現咖啡色及聞到焦香後加入橄欖油、紅椒粉和乾辣椒碎。熄火,晾涼備用。
3. 大鍋燒滾水後轉慢火,加入白醋拌勻,用筷子輕輕攪出漩渦。小碗打入一隻雞蛋,小心把蛋倒入漩渦裡,煮約 3 分鐘後把水煮蛋盛起並放到廚房紙上吸乾水份。
4. 把乳酪平均分配到兩個碗子裡後各放上一隻水波蛋。淋上辣椒牛油,再撒上刁草和乾辣椒碎,最後拌上厚切酸種麵包吐司即成!

[Follow me on Instagram @alvinckl and @alvin.penthousekitchen and check out my Facebook Fan Page!]


Monday, April 29, 2019

Peach Gum Dessert Soup with Red Dates, Longan, and Lotus Seeds | 紅棗桂圓雪蓮子桃膠糖水

附中文食譜

Of all the health food fads that saturate our pantries and social media these days, peach gum - a relatively recent Chinese beautifying food sensation - is surely one to stay. Peach gum (桃膠) has been making increasing appearance on shelves in health food stores and on dessert menus across town, and it did not take me long to finally give in and snatch myself a bag of this curious gemstone-lookalike when I saw some on sale at a food fair.

Serve this dessert hot for a nourishing treat or chilled for a refreshing twist
A little goes a long way: peach gum expands drastically when soaked in water
Peach gum, also known by its winsome moniker "peach blossom tears", is essentially the sap secreted from the bark of the peach tree which is harvested in its crystalline form. Naturally cholesterol-free and rich in amino acids, collagen, and soluble fiber, peach gum is widely touted for its (almost mythological) skin-beautifying power and certain curative qualities. Often likened to the coveted but controversial bird's nest in terms of properties and nutritional value, and with a texture similar to hasma, it is no wonder why peach gum - available at a fraction of the cost of other Chinese delicacies - is gaining such popularity around the world, especially among women.

What makes peach gum so good? It's cheap, and no animal cruelty is involved. I like the sound of that.
Peach gum, when soaked in water overnight, expands astonishingly in size. Read: a little goes a long way! These amber-hued, gem-like crystals plumps up into translucent clouds that are at once soft and dense to the bite, with a gelatin bouncy texture that reminds of aiyu jelly ubiquitous in Taiwanese desserts and beverages. As peach gum is generally tasteless, it features well in many desserts and soups, sometimes even stews. With as few as six crystals being plenty for a single serving, a bag of peach gum could last a remarkably long time, which translates into incredible value.

As peach gum is believed to have cooling properties in traditional Chinese medicine, cooking peach gum with dried longan and red dates give balance to this dessert
Peach gum is believed to be beneficial to both our stomach and skin
Whilst all sounds too fantastical to be real, the cleaning process, inevitably, does require some patience and time. I find rinsing the peach gum and replacing the water every now and then along the way during the soak less overwhelming than removing the dirt and debris all at once at the end. Also, a pair of kitchen tweezers would come in very handy. 

From my little experience working with peach gum, I could confidently surmise that what one pays for a peach gum dessert outside largely covers the labor cost of picking out the dirt (and rent, and then some). With just a little effort, you too can be making this nutritious dessert at next to nothing in cost. The recipe is so easy and the result so worthwhile you'd soon be making more, I promise. What would one not do for beauty?

( I must admit, I am in love with this photoshoot... I purposefully dug out from storage my late mom's collection of vintage Chinese chinaware. They will probably start appearing in more photoshoot in the near future! )

What you'll need...
1 scant tablespoon (approx. 12 g)  peach gum
8 Chinese red dates
8 dried longan
10 dried lotus seeds
1 scant tablespoon goji berries
40 g rock sugar (or to taste)
800 ml water

Directions...
1. Soak peach gum in water overnight or a minimum of 6 hours. Discard water, rinse and remove any impurities.

2. Remove any sprout found in the lotus seeds. Using kitchen shears, remove the pit from the red dates. Soak lotus seeds, red dates, and dried longan in water to soften. Give the goji berries a quick rinse and set aside.

Peach gum expands up to 20 times in size, so a little goes a long way! Don't go overboard or you will regret when cleaning the peach gum...!
3. Place lotus seeds, red dates, and longan in a saucepan with 800 ml water and bring to a boil. Lower heat to a rolling simmer and let simmer for 25 minutes, covered. Add peach gum, goji berries, and rock sugar and let simmer for another 15 minutes. Serve dessert hot or chilled. Enjoy!


【 紅棗桂圓雪蓮子桃膠糖水 】
誰說滋潤糖水只限秋冬飲用!養顏健康可謂長年累月的功夫啊~ 近年桃膠大受熱捧,口感爽滑煙韌QQ,具高纖、高植物性蛋白質的優點,而且價錢大眾化,在水裡浸發過後只需少少心機清潔好,你都能夠輕易造出甜美滋潤美顏糖水啊~ 忠告:不要貪心浸過多桃膠啊,要不然會後悔... 

不得不承認,我個人很喜歡滿意這一輯相啊~ 為了這輯相,特意尋找媽媽以前珍藏下來的一套碗碟... 重見天日後,希望多點同大家見面!

材料:
桃膠           12 克(約 1 小湯匙)
紅棗           8 粒
桂圓           8 粒
蓮子           10 粒
杞子           約 1 湯匙
冰糖           40 克(視乎個人口味)
清水           800 毫升

做法:
1. 桃膠用大量清水浸發 6 小時或過夜。去除雜質、沖洗乾淨後瀝乾桃膠備用。
2. 蓮子去芯、紅棗去核,連同桂圓用清水浸軟。杞子略沖水備用。
3. 將蓮子、紅棗、桂圓和 800 毫升清水倒入煲內,待水滾後轉中慢火煮 25 分鐘。
4. 加入桃膠、杞子和冰糖,慢火煮 15 分鐘後即成,冷熱佳宜!

備註: 浸發好的桃膠體積可增達 20 倍,所以少量已足夠!

[Follow me on Instagram @alvinckl and @alvin.penthousekitchen and check out my Facebook Fan Page!]