Showing posts with label Hong Kong Canto classic. Show all posts

Monday, August 19, 2024

Salmon Fish Head Soup with Tomato, Potato, and Tofu|番茄薯仔豆腐三文魚頭湯

I
t has been four years since my previous post, and during this time, the world, particularly Hong Kong, has experienced unimaginable changes. My own life has also taken drastic turns, a tale that I may save for another day.
 
Even though I may have taken a step back from this blog which I once poured my heart and soul into building, my love for cooking and sharing recipes remains unwavering.
 
With the increasing demands of running two start-ups around the clock, my time in the kitchen has significantly diminished. This has led me to fall into the unhealthy cycle of eating poorly. At times, I find myself going back to my blog to find inspiration for a simple and efficient meal prep idea that can see me through the week.

And this, my friends, is precisely the reason why I launched this blog ten years ago.
 
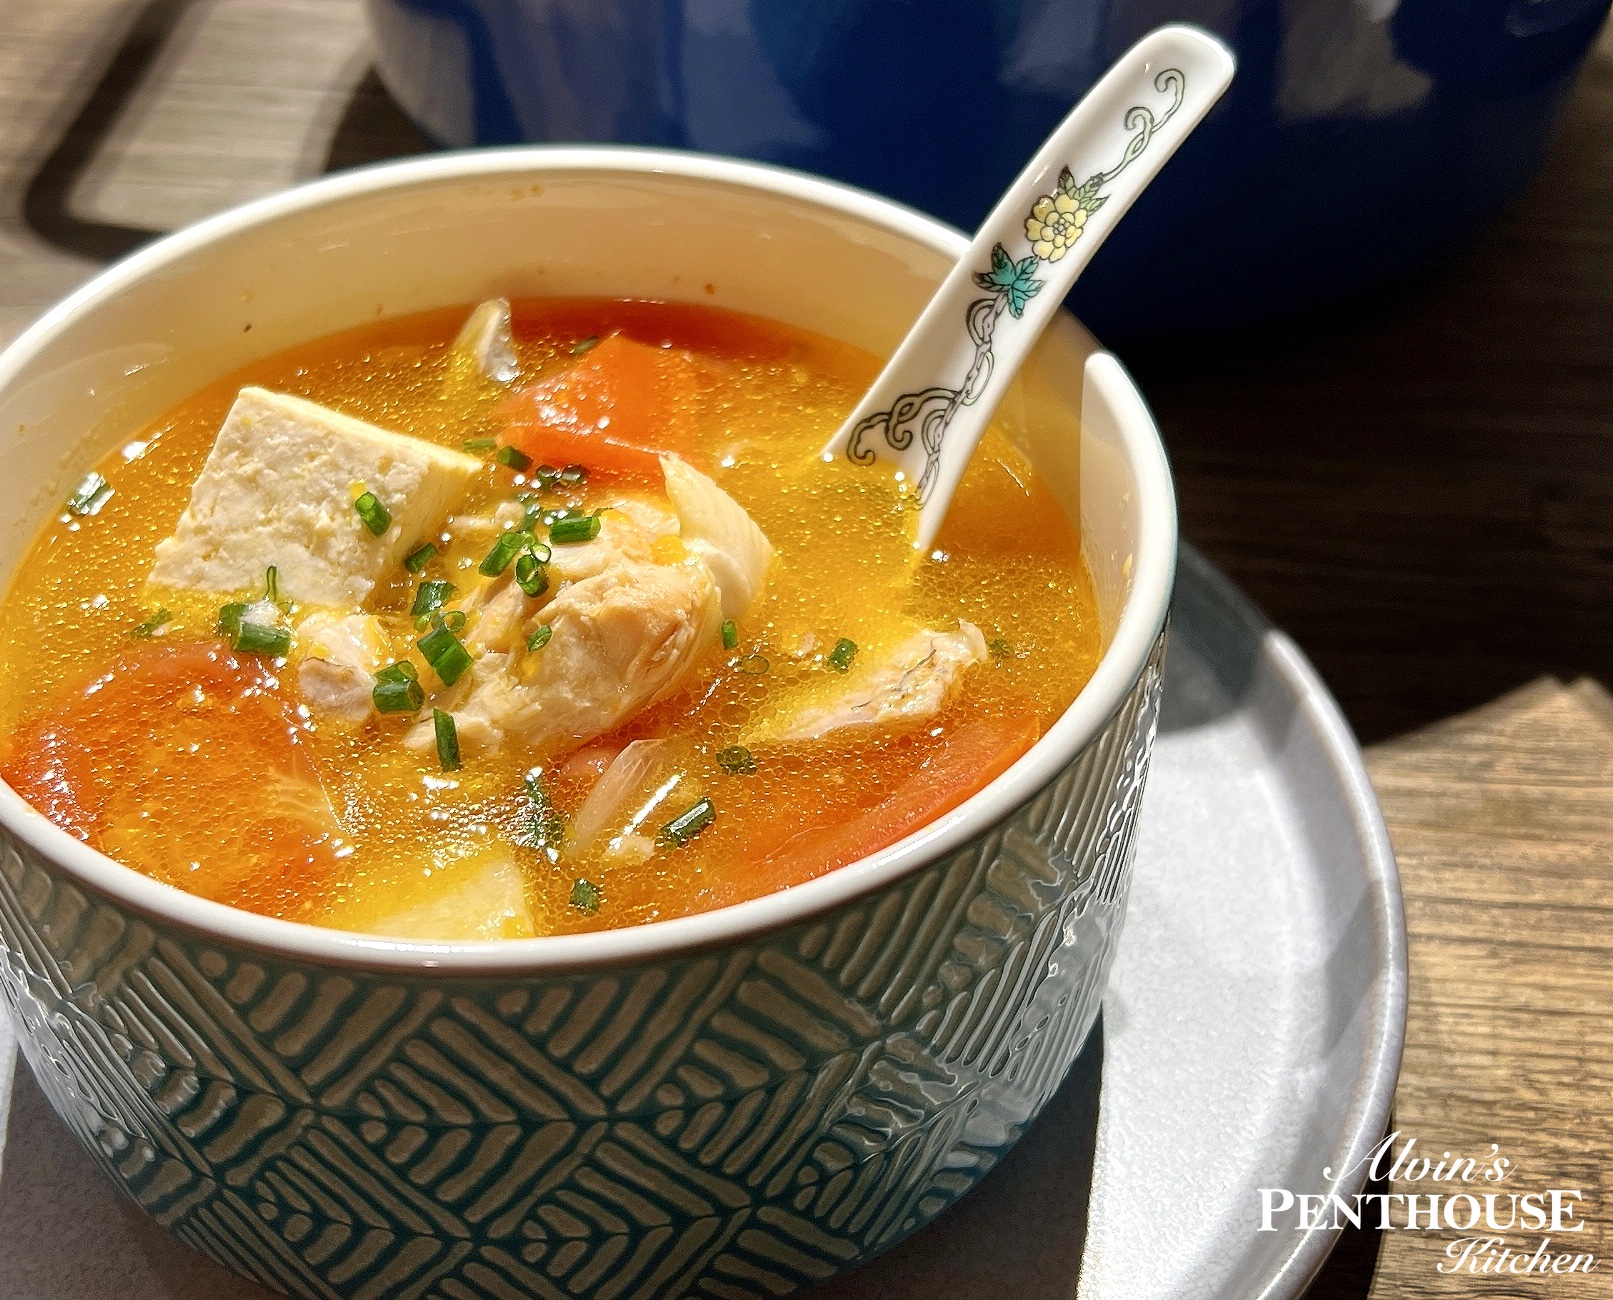
Given my time constraints, tight budget, and desire for healthy homemade meals, efficient and simple cooking is crucial. Lately, I've fallen in love with making a particular soup that is not only nourishing and comforting, but is also remarkably easy to make. This soup serves as a satisfying and complete meal that ticks all the boxes. I make enough to feed a village (enough to last me for up to 5 meals), portioned into containers that conveniently pop straight into the microwave.

While I may currently not have the luxury to indulge in a full-blown food photography session – a process I absolutely relished but which can span days from preparation to post-production – I still wanted to share this recipe not just for my personal keepsake, but also with every one of you who, like me, yearn for a heartwarming and nutritious meal at home.
 
So now, enough talk. Let's dive straight into this incredible soup! While this wasn't a soup I regularly had growing up, it's certainly one that I am very fond of. The distinct flavor and aroma of salmon; the classic combo of potatoes and tomatoes in a broth which forms the foundation of numerous childhood meals. While one can stick to just these three main ingredients, I like to add onion, carrots, and pumpkin to further boost the natural sweetness and nutritional value of the soup, turning it into a wholesome, all-in-one meal.

Ingredients: Servings for 5
1 salmon fish head, split in the middle, gills removed
1/2 inch ginger, sliced
1 brown onion, coarsely sliced
5 medium tomatoes, cut into wedges
1700 ml hot water
2 potatoes
1 block firm tofu, cubed
10 black peppercorn
1 teaspoon cooking oil

Optional Add-ins:
Carrots
Pumpkin or butternut squash

Directions...
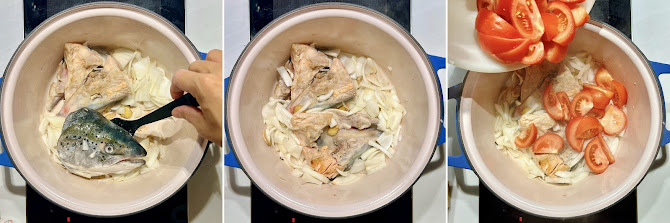
1. Use paper towels to pat the fish head dry. Heat a large, heavy bottomed pot or dutch oven over medium high heat. Add oil and lightly fry ginger slices until fragrant. 

2. Add fish head, flesh side down, and salt generously. Nestle sliced onions around the fish head, gently stir to coat in oil. Let sizzle undisturbed, then carefully flip the fish head, salt, about 2 minutes on each side.
3.  Add tomato wedges and black peppercorn, pour in the hot water, cover with lid and cook over medium heat for 5-8 minutes.

4. Peel and cube the potatoes, carrots, and pumpkin if using. Add to soup and bring to a boil, then reduce the heat to a simmer for 20 minutes or more if you like your potatoes very tender and the pumpkin entirely dissolved. Add tofu and let cook for several more minutes. Enjoy!


This soup is bursting with so much flavor that no additional seasoning is necessary.Savor the tender chunks of salmon, the sweetness from onions, pumpkin, and tomatoes, and the satisfaction of treating yourself well. And, did I mention that there's minimal cleanup required?
Tried this recipe?
Share with me or leave a comment below! Tag #alvinspenthousekitchen.
Find me on Instagram @alvinckl and @alvin.penthousekitchen!

Thursday, April 2, 2020

Steamed White Sugar Sponge Cake | 傳統白糖糕

附中文食譜
The classic Chinese steamed white sugar sponge cake is a childhood favorite for many, and it is no exception for me growing up in 1990's Hong Kong. The sheer thought of this humble street snack brings back many sweet memories - of my mother always buying me a couple of slices every time she visited the wet market; and me always looking at her with puppy eyes whenever we passed by a shop selling the familiar triangular slices. It is a symbol of joy in its simplest form.

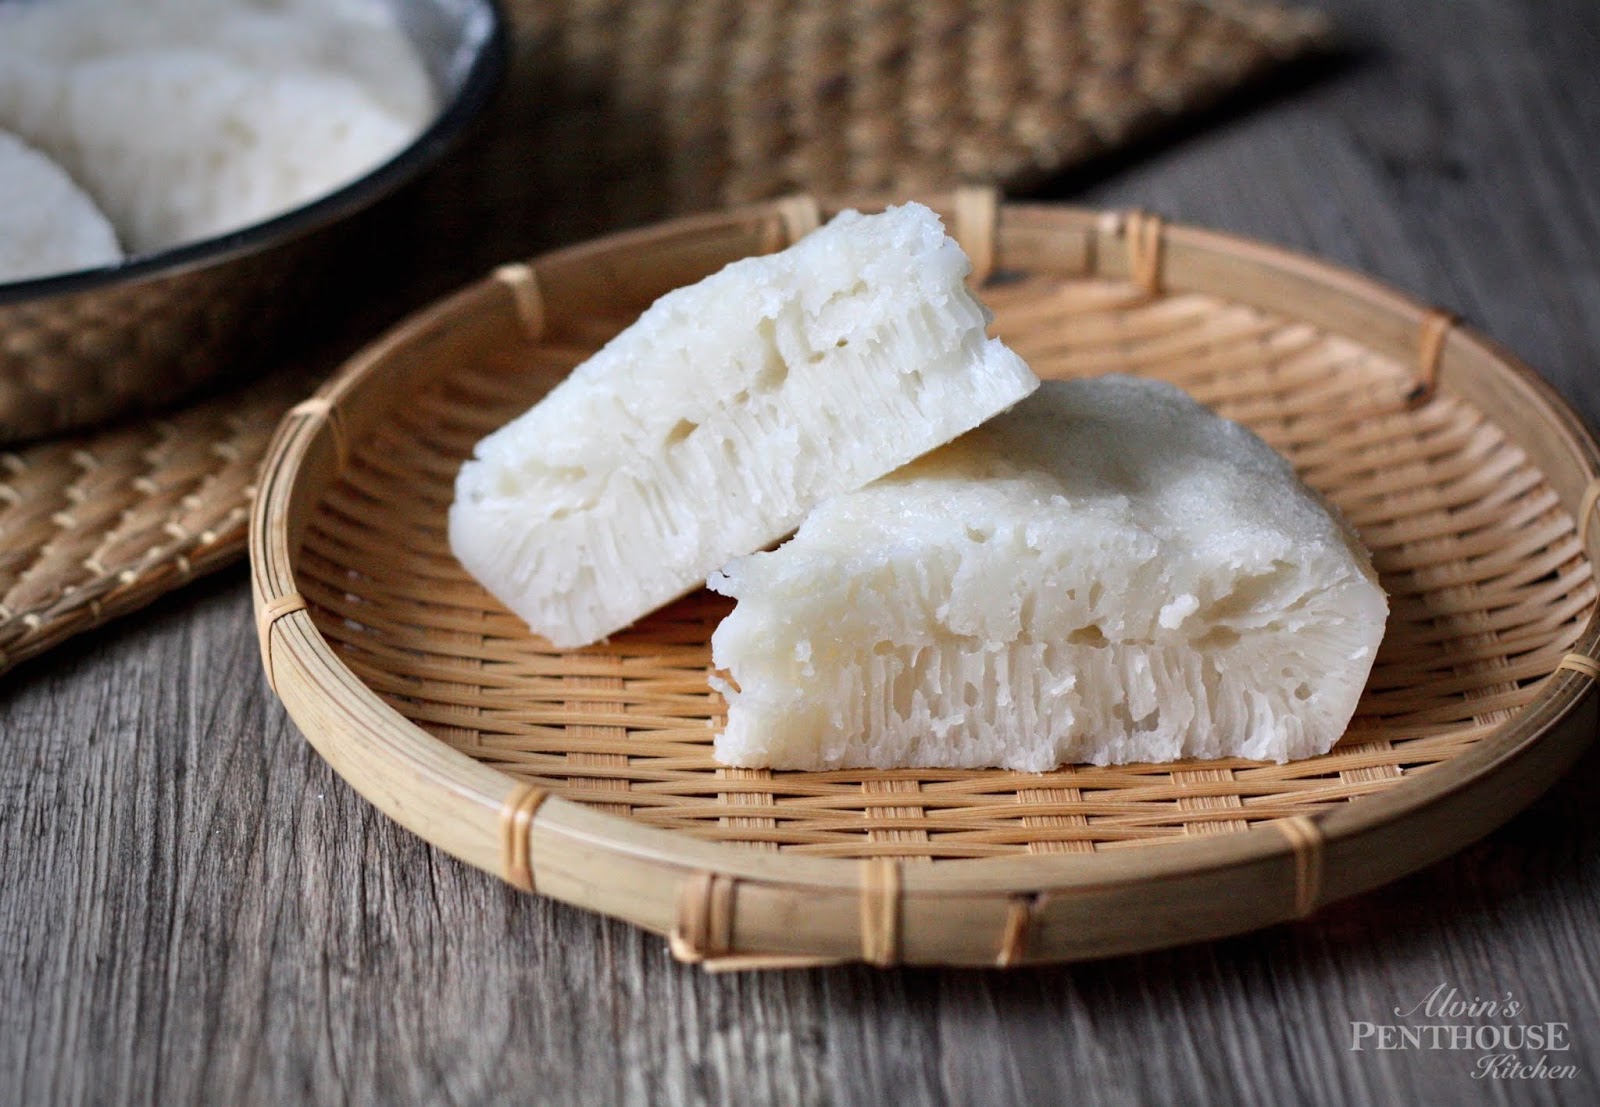
The steamed white sugar sponge cake (白糖糕, bak tong gou) is light and fluffy, glossy and slightly sticky to the touch, and moist and springy on the inside. It is sweet - but not tooth-achingly sweet, with a faint floral aroma that reminds of sweet rice wine and fermented glutinous rice that I adore (even as a child) and later come to recognize as yeast. Tearing into the cake would reveal an intricate honeycomb-like columnar structure that I always, to this day, find absolutely fascinating.

I may have since then left home for the United States for school for a number of years and not had bak tong gou for ages, but my affinity for this childhood favorite never weakened. Even upon my return to Hong Kong, I always made a stop at this old hawker who sold all kinds of traditional homemade confections from a little cart on Wellington Street, Central. This old hawker would have long gone by now. And with this old gentleman being quite possibly the very last hawker vending traditional sweets under the government's non-transferable itinerant hawker license, bak tong gou and the like will now be only found at handfuls of traditional bakeries, congee shops, and occasional dim sum lunches across town. The fond memories that many of us share of this childhood favorite, however, never fades.

Making the steamed white sugar sponge cake at home is really rather simple. With such a simple and inexpensive ingredient list, making this cake yourself and revisiting the memory lane might in fact be easier than finding this cake on the streets these days. As the name suggests, bak tong gou calls for granulated white sugar, giving the cake that pure white appearance that becomes slightly off-white only with the addition of yeast. Using brown sugar would create a sister version of the sponge cake, (黃糖糕) wong tong gou, or as Hong Kongers call it - steamed yellow sugar sponge cake. And like many traditional Chinese cakes, the sponge cake is steamed rather than baked.

The yeast gives the steamed sponge cake a distinct, honeycomb-like columnar texture and appearance
I have tried different methods and measurements for making the bak tong gou, and the one I share here by far trumps all others when it comes to effort and ease. Conventional approach will suggest cooking the rice flour mixture together with the sugar syrup over low heat on the stove top, which would require rigorous stirring and a greater attention span to prevent lumps from forming. I have also tried the double-boiler method which, while providing less direct heat, likewise requires continuous stirring. Instead, to make life and an already easy recipe a whole lot easier (who doesn't like the sound of that?), simply dissolve the sugar and yeast in warm water and add them to the rice flour mixture and give that a good stir, and the mixture is ready to rest.

Bak tong gou should taste sweet but not sour, which is a sign of over fermentation
By doing this, not only will you save loads of time from having to wait impatiently for the mixture to cool down before adding the yeast (lest you kill the yeast), you also spare a whole lot of elbow grease and the risk of ending up with undesirable lumps in the batter. Boom, an easy recipe just made even easier.

After putting together the batter, it is to be simply left covered for hours to allow the yeast to do its thing. The exact amount of time varies with ambient temperature, ranging anywhere from three hours in summer up to seven in colder months. Following the below technique will significantly cut the idle time, regardless the season.

I have long been known to detest precise measurements in the kitchen, relying almost too wholeheartedly on "the senses" and cups and tablespoons and only reluctantly pulling my kitchen scale out when converting recipes into metric units when called for. Most recipes online for the steamed sponge cake come in metric unit. Fortunately, the steamed sponge cake is very forgiving to minor mathematical errors. Out of convenience, here I provide both measurements in cups as well as grams or millimeters. From here on out, with this recipe finally consolidated and added to my collection, I am rejoicing that my kitchen scale can rest in peace inside the cabinet whenever I make bak tong gou. Perhaps I would be making this cake and walking down the memory lane more often from now on!

Ingredients...
1 cup warm water, divided
1 cup water
2 cups (280 g) rice flour
3/4 cup (150 g) white sugar, divided
2 teaspoons active dry yeast
1/4 teaspoon vegetable oil

Proofing the yeast & making the batter
1. Transfer 1/4 cup of the warm water into a cup or bowl. The water should be around or just slightly higher than body temperature (roughly 100°F/38°C) and not hot to the touch. Tip in the active dry yeast along with 1/2 teaspoon of the sugar, stir well and let rest for 10 minutes or until foamy.

2. In a large mixing bowl, combine the rice flour and 1 cup of water (room temperature). Stir until thick and smooth.

3. Add sugar to the remaining 3/4 cup of warm water and mix well until sugar dissolves. Check that the syrup is close to body temperature and not hot to the touch.

4. Add the yeast mixture and syrup to the flour mixture and stir well to combine. Cover with cling wrap and place inside a microwave or oven along with two cups of boiling water to generate heat. Close the door and let the batter rest for 2 hours or until large bubbles form on the surface of the batter. Refresh the boiling water to speed up the process if needed.


Steaming the cake
1. Grease a 9-inch round cake pan generously with oil. Once the batter is ready, remove from the oven, stir well, and transfer batter to a large measuring cup. Add vegetable oil and stir to combine.

2. For a smoother cake surface, pour batter over a strainer into the cake pan and discard the foam. Steam over high heat, covered with the lid wrapped with a tea towel, for 25 minutes.

3. Turn the heat off and allow the cake to rest in the steamer for 10 minutes with the lid off. Remove cake from the steamer and let cool for another 10 minutes on the counter. Slice and enjoy fresh at its best!

Note: Cover and store at room temperature for up to 24 hours. After that, refrigerate for up to 4 days. To reheat, steam gently.

Is Bak Tong Gou also your childhood favorite?
Share with me or leave a comment below! Tag #alvinspenthousekitchen.
Find me on Instagram @alvinckl and @alvin.penthousekitchen and follow my Facebook Fan Page!

【 傳統白糖糕 】

自細對白糖糕就有著一種情意結。想當年媽媽知道我最愛白糖糕,每次落街市都會買來給我吃;人大了,白糖糕依然充滿著童年回憶。別看白糖糕外表平凡,一件好的白糖糕雪白晶瑩、味道清甜芳香而不酸、入口爽滑而稍韌,難怪令人難以抗拒。自家製白糖糕十分簡單,經過屢次改良,終於研製出以下最簡易、最省時、零失敗的食譜跟大家分享、一起懷緬童年!

材料:
溫水*                      240 毫升
清水                        240 毫升
粘米粉                    280 克
砂糖                        150 克
即溶酵母                2 茶匙
菜油                        1/4 茶匙

做法:
1. 先用 60 毫升溫水來開即溶酵母,加入半茶匙砂糖,拌勻備用約 10 分鐘。
2. 粘米粉及清水拌勻至輕微黏稠狀,備用。
3. 剩餘砂糖與溫水攪勻至完全溶解。
4. 將發好起泡的酵母和糖水加入粘米粉漿內拌勻。
5. 蓋上保鮮紙,連同 2 杯滾水放置在微波爐或焗爐裡面發酵 2 小時,直至粉漿出現大氣泡。滾水會製造蒸氣熱力,有助粉漿在受控的環境下迅速發酵。
6. 發酵好的粉漿加入菜油拌勻,隔篩(隔除過量氣泡,白糖糕表面會更加光滑)倒入已掃油的圓形不鏽鋼碟內,用大火蒸約25分鐘。
7.  熄火開蓋,待涼約 10 分鐘後把白糖糕取出再晾涼約 10 分鐘後切件即成!

備註:
1. *注意暖水溫度應接近或輕微高於體溫,不應燙手,不然會「殺死」酵母。
2. 家中如有蒸籠,可以用蒸籠去蒸,不然可以用毛巾包著煲蓋隔水蒸,有助防止倒汗水滴在糕面,影響製成品。
3. 正宗白糖糕其實不該帶有酸味,而酸味可能來自發酵過度。

Is Bak Tong Gou also your childhood favorite?
Share with me or leave a comment below! Tag #alvinspenthousekitchen.
Find me on Instagram @alvinckl and @alvin.penthousekitchen and follow my Facebook Fan Page!
Monday, April 29, 2019

Peach Gum Dessert Soup with Red Dates, Longan, and Lotus Seeds | 紅棗桂圓雪蓮子桃膠糖水

附中文食譜

Of all the health food fads that saturate our pantries and social media these days, peach gum - a relatively recent Chinese beautifying food sensation - is surely one to stay. Peach gum (桃膠) has been making increasing appearance on shelves in health food stores and on dessert menus across town, and it did not take me long to finally give in and snatch myself a bag of this curious gemstone-lookalike when I saw some on sale at a food fair.

Serve this dessert hot for a nourishing treat or chilled for a refreshing twist
A little goes a long way: peach gum expands drastically when soaked in water
Peach gum, also known by its winsome moniker "peach blossom tears", is essentially the sap secreted from the bark of the peach tree which is harvested in its crystalline form. Naturally cholesterol-free and rich in amino acids, collagen, and soluble fiber, peach gum is widely touted for its (almost mythological) skin-beautifying power and certain curative qualities. Often likened to the coveted but controversial bird's nest in terms of properties and nutritional value, and with a texture similar to hasma, it is no wonder why peach gum - available at a fraction of the cost of other Chinese delicacies - is gaining such popularity around the world, especially among women.

What makes peach gum so good? It's cheap, and no animal cruelty is involved. I like the sound of that.
Peach gum, when soaked in water overnight, expands astonishingly in size. Read: a little goes a long way! These amber-hued, gem-like crystals plumps up into translucent clouds that are at once soft and dense to the bite, with a gelatin bouncy texture that reminds of aiyu jelly ubiquitous in Taiwanese desserts and beverages. As peach gum is generally tasteless, it features well in many desserts and soups, sometimes even stews. With as few as six crystals being plenty for a single serving, a bag of peach gum could last a remarkably long time, which translates into incredible value.

As peach gum is believed to have cooling properties in traditional Chinese medicine, cooking peach gum with dried longan and red dates give balance to this dessert
Peach gum is believed to be beneficial to both our stomach and skin
Whilst all sounds too fantastical to be real, the cleaning process, inevitably, does require some patience and time. I find rinsing the peach gum and replacing the water every now and then along the way during the soak less overwhelming than removing the dirt and debris all at once at the end. Also, a pair of kitchen tweezers would come in very handy. 

From my little experience working with peach gum, I could confidently surmise that what one pays for a peach gum dessert outside largely covers the labor cost of picking out the dirt (and rent, and then some). With just a little effort, you too can be making this nutritious dessert at next to nothing in cost. The recipe is so easy and the result so worthwhile you'd soon be making more, I promise. What would one not do for beauty?

( I must admit, I am in love with this photoshoot... I purposefully dug out from storage my late mom's collection of vintage Chinese chinaware. They will probably start appearing in more photoshoot in the near future! )

What you'll need...
1 scant tablespoon (approx. 12 g)  peach gum
8 Chinese red dates
8 dried longan
10 dried lotus seeds
1 scant tablespoon goji berries
40 g rock sugar (or to taste)
800 ml water

Directions...
1. Soak peach gum in water overnight or a minimum of 6 hours. Discard water, rinse and remove any impurities.

2. Remove any sprout found in the lotus seeds. Using kitchen shears, remove the pit from the red dates. Soak lotus seeds, red dates, and dried longan in water to soften. Give the goji berries a quick rinse and set aside.

Peach gum expands up to 20 times in size, so a little goes a long way! Don't go overboard or you will regret when cleaning the peach gum...!
3. Place lotus seeds, red dates, and longan in a saucepan with 800 ml water and bring to a boil. Lower heat to a rolling simmer and let simmer for 25 minutes, covered. Add peach gum, goji berries, and rock sugar and let simmer for another 15 minutes. Serve dessert hot or chilled. Enjoy!


【 紅棗桂圓雪蓮子桃膠糖水 】
誰說滋潤糖水只限秋冬飲用!養顏健康可謂長年累月的功夫啊~ 近年桃膠大受熱捧,口感爽滑煙韌QQ,具高纖、高植物性蛋白質的優點,而且價錢大眾化,在水裡浸發過後只需少少心機清潔好,你都能夠輕易造出甜美滋潤美顏糖水啊~ 忠告:不要貪心浸過多桃膠啊,要不然會後悔... 

不得不承認,我個人很喜歡滿意這一輯相啊~ 為了這輯相,特意尋找媽媽以前珍藏下來的一套碗碟... 重見天日後,希望多點同大家見面!

材料:
桃膠           12 克(約 1 小湯匙)
紅棗           8 粒
桂圓           8 粒
蓮子           10 粒
杞子           約 1 湯匙
冰糖           40 克(視乎個人口味)
清水           800 毫升

做法:
1. 桃膠用大量清水浸發 6 小時或過夜。去除雜質、沖洗乾淨後瀝乾桃膠備用。
2. 蓮子去芯、紅棗去核,連同桂圓用清水浸軟。杞子略沖水備用。
3. 將蓮子、紅棗、桂圓和 800 毫升清水倒入煲內,待水滾後轉中慢火煮 25 分鐘。
4. 加入桃膠、杞子和冰糖,慢火煮 15 分鐘後即成,冷熱佳宜!

備註: 浸發好的桃膠體積可增達 20 倍,所以少量已足夠!

[Follow me on Instagram @alvinckl and @alvin.penthousekitchen and check out my Facebook Fan Page!]

Wednesday, August 22, 2018

Savory Chilled Tofu with Century Egg | 涼拌尖椒皮蛋豆腐

Some call it century egg, others call it the thousand-year-old egg, or millennium egg. In Hong Kong, it is simply known as pei-daan. However you call it, this most certainly isn't the ordinary egg you'd poach, scramble, or fry with.

Enveloped inside a translucent, soy-sauce colored, gelatinous egg "white" is a soft, gooey, greenish-black yolk - the ghastly color of gloom, one may say. The bouncy jelly-like exterior may not taste much of anything, but the dark center has the texture and sharpness of very ripe Camembert - creamy, pungent, with a heady, palpable whiff of ammonia. (Think your cat's urine. You get the picture.) Century eggs come covered in clay and rice hulls which, coupled with its somewhat misnomer of a name, does for a second appear like some dinosaur fossil excavated from an archeological expedition.

It is no wonder the century egg has proudly made appearance on TV shows like Andrew Zimmern's Bizarre Foods and Fear Factor, the daredevil game show where contestants were once pitted against each other devouring and gagging on whole eggs alone.

So what is a century egg anyway? Long story short, the century egg is a preserved egg, most often a duck egg, sometimes chicken, or even quail, cured in a mixture of ash, quicklime, clay, salt, and rice hulls for a period time between several weeks to months. It happens to be an age-old Chinese delicacy that is oh-so-yummy when smartly paired with something else, not unlike Roquefort complemented with a glass of Sauternes.

In Hong Kong, the century egg is most often seen in the ubiquitous breakfast congee (rice porridge) cooked with lean pork, or encased in pastry with sweet bean paste and a touch of ginger. In restaurants, it is frequently served as an amuse-bouche alongside paper-thin slices of pickled young ginger, or as a side dish smothered in a savory blend of chili, garlic, and herbs. The trick is to enjoy the century egg in small bits along with other flavors and textures, lest you'd probably gag on eating the whole thing plain.

Century eggs take on strong flavors well and pairs exceptionally well with tofu for a contrast in textures. Here we have a typical household recipe that many families keep with minor variations. One thing absolutely in common is that there are no skills involved whatsoever and the entire dish practically comes together in under 15 minutes. It celebrates a melange of flavors and textures - from the silkiness of chilled tofu, the juxtaposition of chewiness and creaminess of century egg (and its odor), the heat of peppers, and the sweet and savoriness of the sauce. Some would also top the dish with dried pork floss. Opt for either sugar or honey for the sweet element - I prefer honey for its floral hint and consistency. The resulting dish makes for a simple, classic side dish, ideal for the sweltering heat of summer!

What you'll need...
2 century eggs
1 block (400 g) silken tofu
2 Chinese long green peppers
2 cloves garlic, minced
1 bird's-eye chili, seeded and chopped
1 tablespoon oyster sauce*
2 teaspoons light soy sauce
1 tablespoon honey
1 teaspoon cooking oil
Spring onion, chopped
Cilantro, chopped

Note: For a vegetarian option, substitute with vegetarian "oyster" mushroom sauce.

Directions...
1. Peel century eggs and rinse with water. Cut into half-inch dice. (Have a glass of warm water ready while dicing the eggs - dip the knife in and wipe off with paper towel each time after slicing to avoid a gunky mess.)


2. De-seed long green peppers, remove pith and finely chop. In a nonstick pan, heat oil on medium heat. Sauté diced green peppers for 1-2 minutes. Add minced garlic and chili, cook until fragrant then lower heat. Stir in oyster sauce, soy sauce and honey. Season to taste, then set aside and allow to cool slightly.

3. Drain tofu, slice and arrange on a platter. Layer diced century egg on top and drizzle sauce mixture over. Sprinkle with spring onion and cilantro. Enjoy!

Tips 
- Press tofu with paper towel to extract excessive water content. If time allows, return tofu to the fridge for an hour before assembling.
- If pressed for time, skip the cooking process and mix the chopped peppers and garlic with the sauce ingredients and pour over tofu and century egg. Watch out for garlic breath though!

【 涼拌尖椒皮蛋豆腐 】

材料
皮蛋                           2 隻
盒裝蒸煮滑豆腐     1 盒
青尖椒                       2 條
蒜頭                           2 瓣
指天椒                      1 隻
蠔油                           1 湯匙
生抽                           2 茶匙
蜜糖                           1 湯匙
油                               適量
蔥                               適量
芫荽                           適量

做法
1. 皮蛋
去殼洗淨,切小丁。建議準備一杯溫水,當刀沾到蛋黃時可沾水再用廚房紙抹乾淨,切皮蛋時會分外整齊。
2. 蒜瓣剁碎。尖椒和辣椒分別去囊去籽再切細粒備用。蔥和芫荽切粒。
3. 開中慢火,易潔鍋入面下少許油,油熱後先放尖椒碎兜炒約 1 – 2 分鐘至出味,然後加入蒜末和辣椒碎略為炒勻。
4. 調到慢火,倒入蠔油、生抽和蜜糖拌勻再作適當調味即可關火。稍微放涼備用。
5. 滑豆腐擠出多餘水份後切片。鋪上皮蛋粒、淋上煮好的醬汁、再撒上蔥花和芫荽即成!喜歡的話,更可加肉鬆!

小貼士
1. 滑豆腐擠乾水份後 , 放入大碗內蓋上保鮮紙放入冰箱冷藏1小時,效果更佳。

2. 如不想開爐火,可以免卻炒尖椒、辣椒及蒜頭的步驟,直接跟醬汁拌勻再淋在豆腐和皮蛋上。個人認為用炒的方法比較香及好吃,且能避免生蒜所引起的「口氣」。

[Follow me on Instagram @alvinckl and @alvin.penthousekitchen and check out my Facebook Fan Page!]

Wednesday, June 8, 2016

Water Chestnut and Lemon Soup Dessert

附中文食譜
The first time I had this dessert it was in the heat of summer years ago at a traditional Chinese dessert house just off of King's Road, North Point. It was one of those mom and pop shops that you fear would one day succumb to skyrocketing rent and, like much of Hong Kong's precious heritage, become history. Perhaps it was the combination of place, company (my much esteemed elderly uncle whose inner child lets loose at the sight of desserts), and the surprising burst of lemon that made this experience particularly memorable.

Water chestnut soup is about as simple as it can get, but chilled and lifted with fresh lemon juice and lemon slices, it is an electrifying treat that snaps you out of summer's indolence.

Widely believed to help remove excess heat buildup in one's body, water chestnut desserts are especially popular and refreshing in summer. Select fresh and firm water chestnuts, but if skinning the suckers proves too tedious, look for vaccuum sealed peeled water chestnuts in your local grocery or even canned ones for a shortcut.

Enjoy the lemony burst and juicy crunch of water chestnuts!

What you'll need...
250g of skinned water chestnuts
3 cups water
80g rock sugar
1 tbsp water chestnut flour
Lemon juice from half a lemon
Lemon slices
Lemon zest

Directions...
1. In a blender, blend half of the water chestnuts into a puree. Set aside. Take the remaining half and either pulse in blender or chop into small pieces.

2. In a small bowl, mix water chestnut flour with some water until smooth.

3. Bring 3 cups of water to a boil. Add diced and pureed water chestnut and return to a slow boil. Stir in water chestnut flour solution and rock sugar and turn heat off shortly after sugar dissolves completely.

4. Let soup cool to room temperature, stir in lemon juice, zest, and lemon slices and chill in the refrigerator. Serve chilled and garnish with more lemon slices as desired. Enjoy!

Tips for skinning a water chestnut: Deshelling a water chestnut is easier than it seems. First, cut the top and bottom off. Then, with thumb gently pressed against the blade of a small knife, carefully peel the skin off by running the blade along the side of the water chestnut.

To make a clearer soup, adjust the proportion of pureed versus diced water chestnuts. Reduce the proportion of puree for a clearer soup.

 《檸檬馬蹄露》
材料:
馬蹄  250 克(去皮計)
清水  3 碗(約 715 毫升)
冰糖  80 克
馬蹄粉  1 湯匙
鮮檸檬汁  約半個檸檬
檸檬片
檸檬皮碎

做法:
1. 將一半的馬蹄用攪拌機磨成茸,另一半切成小粒。
2. 馬蹄粉用少量清水調勻。
3. 燒滾水,加入馬蹄茸、馬蹄粒煮滾。
4. 加入冰糖和馬蹄粉水拌勻,待冰糖完全溶化後熄火。
5. 馬蹄露晾涼至室溫,拌入檸檬汁、檸檬皮碎及數片檸檬,再放進雪櫃冷藏。
6. 冷凍後即可隨時品嚐,另加檸檬片更添風味!

備註:
如果喜歡較為清晰見底的馬蹄露,可調教馬蹄茸對馬蹄粒的比例,減少馬蹄茸的分量。

[Write to me under comments! Follow me on Instagram @alvinckl and check out my Facebook Fan Page!]

Monday, July 6, 2015

Winter Melon Soup with Tonkin Jasmine and Chinese Mushroom

July has barely just arrived, Hong Kong surely already feels like a raging furnace. The crippling heat is exacerbated only by a heavy cloak of subtropical humidity that spares no nook or cranny in its reach. At such times when mere breathing is sufficient to make one perspire, the last thing one would dream of is slurping a scalding hot bowl of soup.

Add flavor with dried mushrooms or seafood
Much to the contrary, generations of wisdom in Cantonese cuisine - backed by an all-encompassing, deep-seated "science" of internal balance and "hot versus cold" - have developed just the kind of soups that are believed to beat the heat with the right application of ingredients.

One such summer-specific "tonic" is the winter melon soup (an interesting irony, I reckon). White and mildly sweet in the flesh and dark green and waxy on the skin, the winter melon (冬瓜) - also known as wax gourd - typically grows to impressive sizes and often comes in pre-sliced wheels or otherwise dissected on the spot at markets. Winter melon soups are widely known to help dispel excessive heat and moisture accumulated in one's body, and are generally nourishing and cooling against summer's unforgiving climate.

A winter melon's delicate white flesh carries no distinct taste on its own, so other flavorful ingredients such as pork bones, dried Chinese mushrooms, dried shrimps and conpoy take up the role in flavoring.

Tonkin Jasmine: the "Night Fragrance"
If you are lucky, you might just run into packets of handpicked Tonkin jasmine flowers (夜香花) sold alongside winter melons which, to me, are like the cherry on the cake in this popular summer soup. Known as "Night Fragrance" in Chinese, these unassuming green and golden yellow blooms got its namesake for seducing passerbys with an even richer fragrance as night falls. During summer months, these inexpensive, modest flower buds silently make their way into local markets in small batches, often used in soups and favored for their delicate perfume and alleged ability to detoxify, maintain eye health, as well as eliminate excessive moisture. Not only do the flowers add a pleasing pop of jade, their crunch also gives a nice contrast to the soft, velvety texture that the winter melon takes on during cooking.

Under the weather? Beat the heat with this "cooling" winter melon soup!
To prepare...
1 1/2 lb winter melon
1 lb pork bones or lean pork
1 inch ginger, sliced
8 Chinese dried mushroom
4 dried scallops (optional), rinsed
8 cups water
A large handful of Tonkin jasmine
Salt, to taste (optional)

1. Soak dried mushrooms in water for a minimum of 20 minutes. Soak Tonkin jasmine in salted water for at least 15 minutes, rinse then set aside.

2. In a small pot, add pork, several slices of ginger and water. Bring to a rolling boil for 4-5 minutes, then turn heat off and discard scum and water. This is a crucial step to ensure a clear soup free from unsightly impurities and unpleasant odours from the pork.

3. Discard seeds and cut winter melon into roughly bite-sized chunks, keeping skin on for aesthetic reasons if desired. Cut mushrooms into thin slices. Place pork, winter melon, mushrooms, scallops (if using), and the rest of the sliced ginger into a large stock pot. Pour in 8 cups of water, cover, and bring to a boil. Continue to boil on medium heat for 15 minutes, then lower to a simmer for 1 hour.

4. When soup is almost done, tip in Tonkin jasmine and leave to simmer for one more minute before turning heat off. Serve piping hot in bowls and season with salt to taste. Happy Summer!!

For more traditional Chinese soup recipes, try:
Fish Maw, Monkey Head Mushroom, Whelk, and Lean Pork Soup

[Write to me under comments! Follow me on Instagram @alvinckl and check out my Facebook Fan Page!]

Tuesday, February 17, 2015

Sea Coconut Snow Fungus Pear Soup Dessert

I came across some fresh, deshelled sea coconut the other day and snatched some into my basket without second thought. A curiously exotic ingredient originally endemic to the Seychelles Islands, the sea coconut has always conjured images of a mythical tree growing on the bottom of the sea - that is, until I finally googled it.

Faintly tangy and sweet, the milky white flesh of these slippery gems give an interestingly firm bite that yields to the teeth with a subtle crunch. In Cantonese cuisine, sea coconut is often simmered in soups both savory and sweet, highly regarded for its medicinal properties to ease dry coughs and to nourish the lungs.

Treat your body to a healthy, soothing dessert!
With the flu and chilly weather that's been going around in Hong Kong lately, it only seems opportune to cook up some nourishing sea coconut tong sui (糖水). Literally "sugar water", tong sui is a Cantonese specialty - not a toothache-inducing syrupy bog per se - but rather a lightly sweetened broth of nutritional goodness. In Hong Kong, tong sui is a proper dessert, served hot or cold, a typical way of ending a meal.

Here, the thinly sliced sea coconut is paired with snow fungus (雪耳/銀耳/雲耳), a powerful, beautifying tonic, along with crisp, sweet Chinese white pears (雪梨/水晶梨/鴨梨). Adding lotus seeds (蓮子) and lily bulbs (百合) further enhances the cough-soothing and yin-nourishing benefits of the soup. Sweeten moderately with rock sugar at the end. Enjoy hot or serve chilled for a very refreshing treat in summer!

To prepare...
4 sea coconuts, deshelled, thinly sliced
3 Chinese white pears, peeled, cored, and diced
1 head snow fungus
Lotus seeds
Lily bulb (dried or 1 small fresh bulb)
8 cups water
Rock sugar, to taste
Gojiberries, for garnish

1. Soak snow fungus in water for 30 minutes to reconstitute. Divide fungus into smaller pieces with kitchen scissors and discard the tough core. Rinse well with water.

2. Place sea coconut, diced pear, snow fungus, lotus seeds, lily bulb, and water in large pot. Bring to a boil then lower to a simmer for 1 1/2 hours, covered.

3. Add rock sugar and stir to fully dissolve. Taste and adjust sweetness as desired. Turn heat off. Garnish with gojiberries and serve warm or chilled!

[Any thoughts or comments? I want to hear from you! Also check out my Facebook Fan Page]

Tuesday, February 10, 2015

Chinese New Year Turnip Cake | 賀年臘味蘿蔔糕

附中文食譜
Select heavy radishes with lustrous skin & fresh leaves
Just under two weeks till Lunar New Year, people all over Hong Kong are scurrying to stock up on gifts and spring cleaning in anticipation of the Year of the Goat. That time of the year has come once again, when folks labor in the kitchen preparing homemade festive cakes and puddings with recipes passed down for generations.

Aside from the sweet and sticky glutinous rice pudding, there's the savory turnip cake (蘿蔔糕, aka. radish cake), a standard, year-round dim sum offering that becomes indispensable during New Year celebrations. Made from shredded Chinese white radish, the turnip cake is typically served steamed or pan fried, its texture soft and moist inside, its flavor mildly peppery, rounded off by the savory-pungent pitch of dried delicacies like shrimps, conpoy, mushrooms, and Chinese sausage.

Dried shrimp, conpoy, and mushroom
For years I have eavesdropped on just how labor-intensive it is to make the turnip cake, from grating radishes to chopping the dried ingredients, resulting in a full day of work, a sweaty forehead and sore forearms to boot. At long last I have put these presuppositions to test, enlisting the help of my dear friend Felix who is a turnip cake veteran, and in one short Sunday afternoon my first ever turnip cake made its debut at my Penthouse Kitchen. Awesome results, awesome fun, minus the sweaty forehead and bulging biceps.

Make it or buy it, there's just no denying that fresh, homemade, preservative-free turnip cakes are worth every effort. Adjust the dried ingredients to your liking. Add lap yuk (臘肉) - Chinese preserved pork - for an extra dimension of taste; load up on white pepper like my grandmother did; or leave out any of the dried seafood and meats as you like for a vegan version. Give homemade turnip cake a shot and this might just become your annual Lunar New Year tradition!

You'll appreciate every effort put on making this authentic Cantonese specialty
To prepare...
2 Chinese radishes, about 1.2 kg
6 dried scallops (conpoy)
A handful of dried shrimps
6 Chinese dried mushrooms
2 Chinese sausages
2 cups rice flour (粘米粉)
1/2 cup cornstarch
1 1/2 cup chicken stock (or soaking liquid*)

Seasoning:
Dash of Shaoxing rice wine
1 + 1/2 teaspoon sugar
1 teaspoon salt
1/2 teaspoon white pepper


1. Soak conpoy, dried shrimp, and mushrooms in water for several hours up to overnight. *Drain and reserve soaking liquid. Dice and set aside. Steam Chinese sausages for 5 minutes. Steaming will soften and remove excess fat from sausages, making them easier to chop. Dice and set aside.

2. Peel and cut each radish in half on the bias for easier grating. Coarsely grate radish, reserving any liquids released from the radishes. Set aside.

3. In a large, ungreased skillet, stir-fry Chinese sausages on medium high heat until fat is rendered. Add rice wine and 1/2 teaspoon of sugar, then tip in mushrooms, conpoy, and dried shrimp and stir-fry until fragrant. Set aside.


4. In a large pot or wok, cook grated radish with its liquids and remaining 1 teaspoon sugar, covered and until tender, about 15 minutes. Radish shall release more juices in the process; should radish appear somewhat dry, stir in small quantities of reserved soaking liquid. Turn heat off.

5. In a large mixing bowl, combine rice flour and cornstarch. Add chicken stock or reserved soaking liquid (about 1 1/2 cup) and stir until dissolved. Season with salt and white pepper. The batter should be a bit runny.


6. Add sausage mixture to the radish. Pour in batter and stir the mixture well while the radish is still hot until incorporated. The batter should begin to grow dense with the heat.

7. Pour mixture into greased cake moulds, glassware, or disposable aluminium pans and steam for 30-40 minutes. Once done, let turnip cake cool and chill overnight to further firm up. To serve, cut 1/2 inch slices and pan-fry on both sides till golden. Serve with 余均益 chili sauce, Sriracha, or your favorite hot sauce. Enjoy and share the fruit of your labor, and may the Year of the Goat bring prosperity, happiness, and health!
 
《賀年臘味蘿蔔糕》

 材料:
蘿蔔刨粗絲,份外增添口感!
白蘿蔔  1.2 公斤
瑤柱  6 粒
蝦米  55 克
冬菇  6 隻
臘腸  2 條
粘米粉  300 克
鷹粟粉  75 克
無鹽雞湯  350 毫升(或用浸冬菇瑤柱水*)

調味:
紹興酒  少量
砂糖  1+1/2 茶匙
鹽  1 茶匙
白胡椒粉  1/2 茶匙

做法:
1. 瑤柱、蝦米、冬菇浸軟切粒(*可以保留浸過的水代替雞湯)。
2. 臘腸隔水蒸 5 分鐘,切粒待用。
3. 蘿蔔去皮,刨粗絲,並保留過程中滲出的蘿蔔水。
4. 用平底鍋以中火爆香臘腸,灑下紹興酒及半茶匙糖,再加入冬菇、瑤柱、蝦米繼續爆透,直至聞到香味,盛起備用。
5. 大鍋加入蘿蔔絲和蘿蔔水及 1 茶匙糖,加蓋小火煮 15 分鐘至蘿蔔絲軟身。
6. 期間用大碗混合粘米粉和鷹粟粉,加入雞湯或浸冬菇瑤柱水以及鹽和白胡椒粉並拌勻。
7. 蘿蔔絲煮好後離火,加入已炒好的配料,隨即加入粉漿並搞拌成為半生熟粉漿。
8. 把粉漿倒入已抹油的糕盤內,用大火隔水蒸 30-40 分鐘。用筷子插進蘿蔔糕中央,如筷子沒粉漿黏住,表示已熟透。冷卻後放進雪櫃過夜有助蘿蔔糕凝固。
9. 蘿蔔糕切件煎香兩面,蘸點余均益或是拉差辣椒醬份外美味!  

[Follow me on Instagram @alvinckl and @alvin.penthousekitchen and check out my Facebook Fan Page!]